A sample Journyx configuration


A sample Journyx configuration
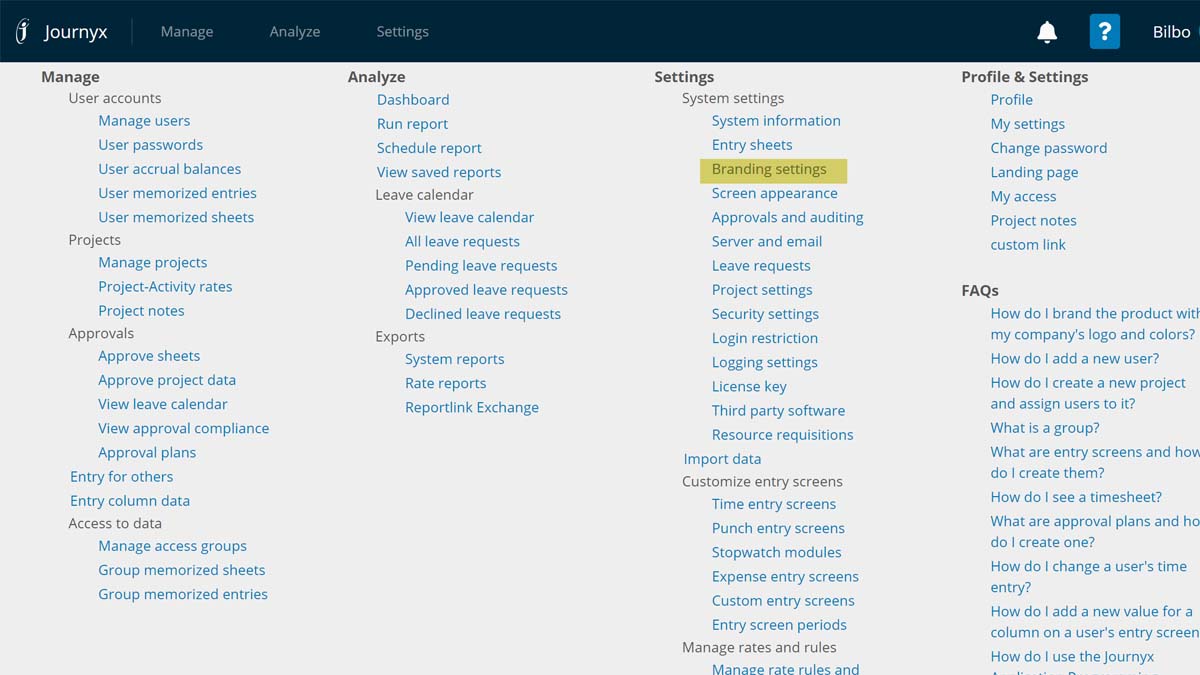
This page contains the basic steps to set up your Journyx system. A lot of information can be found in the help text. Whenever you are on a screen and want to know what something means or what you can do with this screen, click on the question mark in the upper right corner of the screen. In the fold out, click on 'Help' and the screen related information will be shown in a new tab in your browser.
In this sample configuration we will be:
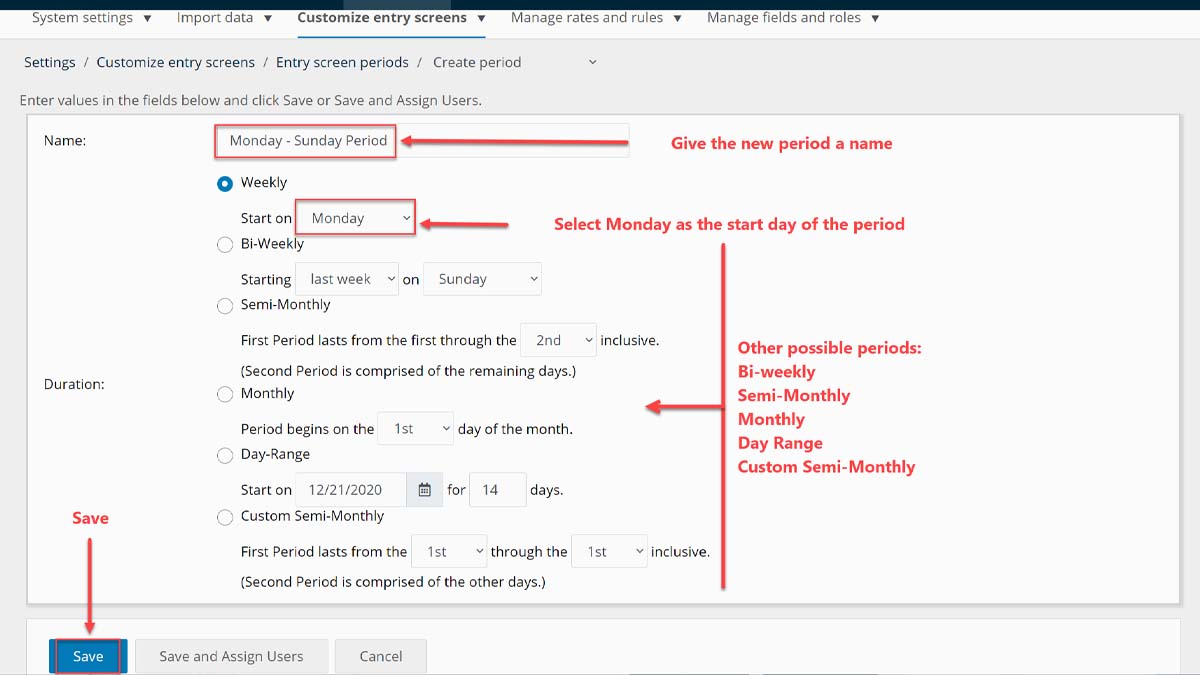
Entry Screen Period Management is located under Settings / Customize entry screens / Entry screen periods. Before users can begin logging time, expense, or custom entries, the system administrator must first create and assign the Periods that the organization will be using.
You can use different periods in your organization. For example, staff uses a monthly period to enter their non billable time while consultants or project members use a weekly period to enter their time.
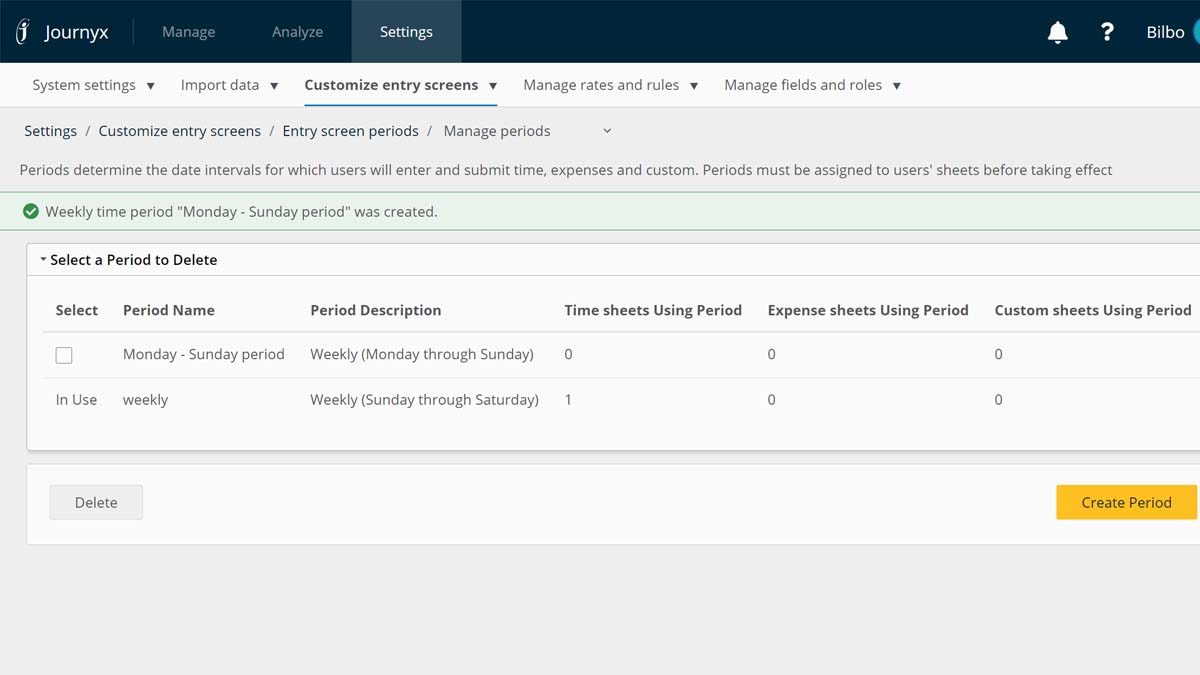
To create a new period, click on the Create button and enter/change the values on the entry period detail screen. don't forget to click on the save button on the bottom of the detail screen. The newly created period will appear on the entry periods management screen.Screen appearance is located under Settings / System settings / Screen appearance. Here you can set the currency symbol and the date formats that need to be used on screens and reports. Change the 'Number of Search Results' to make it easier for the timesheet administrator on the management screens.
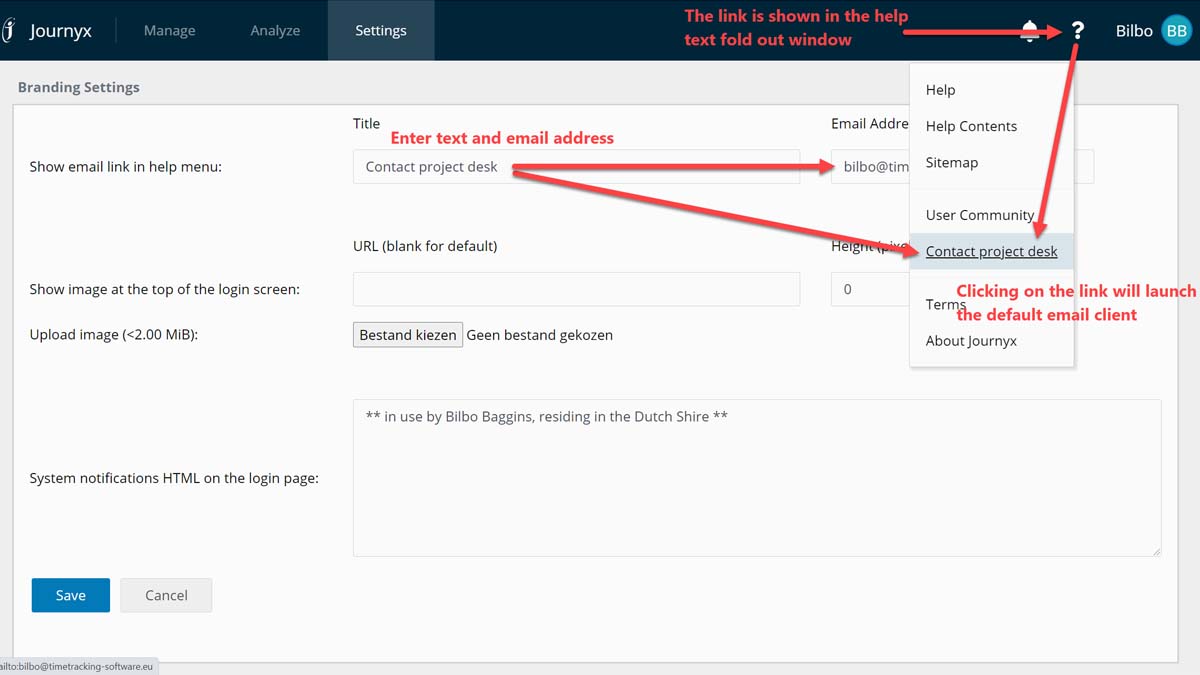
Branding is located under Settings / System settings / Screen appearance. Here you can define to display an email address in the help menu of all pages that users can click on, launching their default email system such as Outlook or Outlook Express. Typically, organizations prefer to use the custom email link to allow users to contact the system administrator. The link title is the text that will be displayed as a link. The default title that will be shown to users is 'Comments to author: Time@journyx.com'.
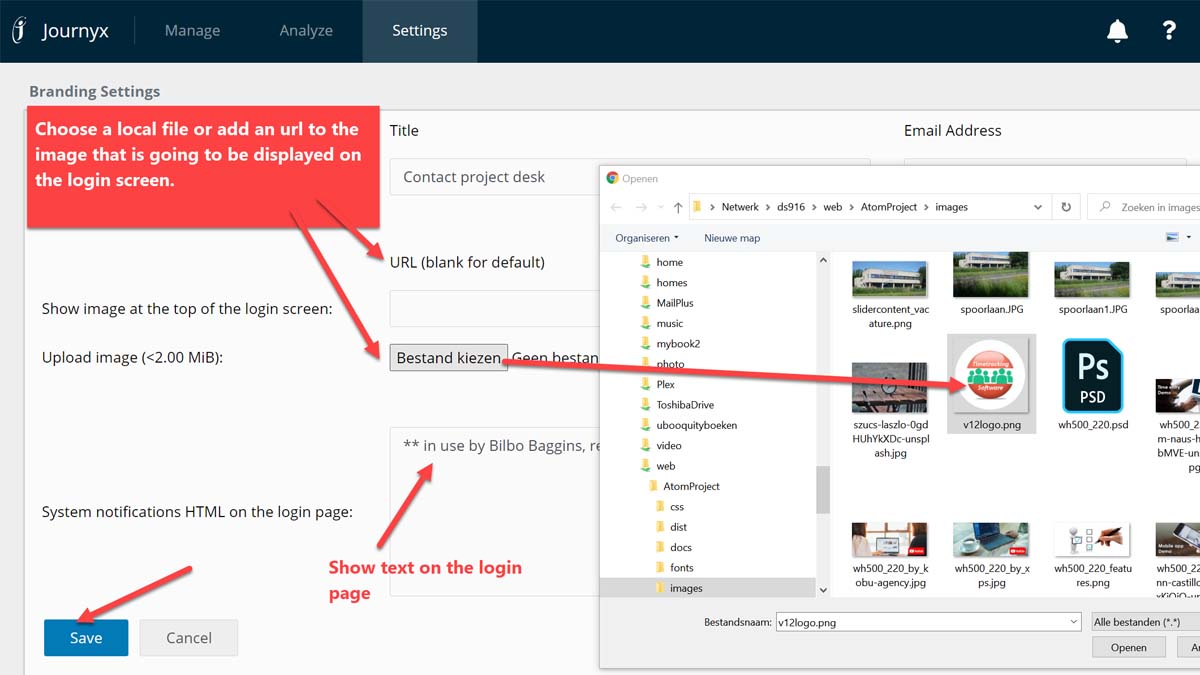
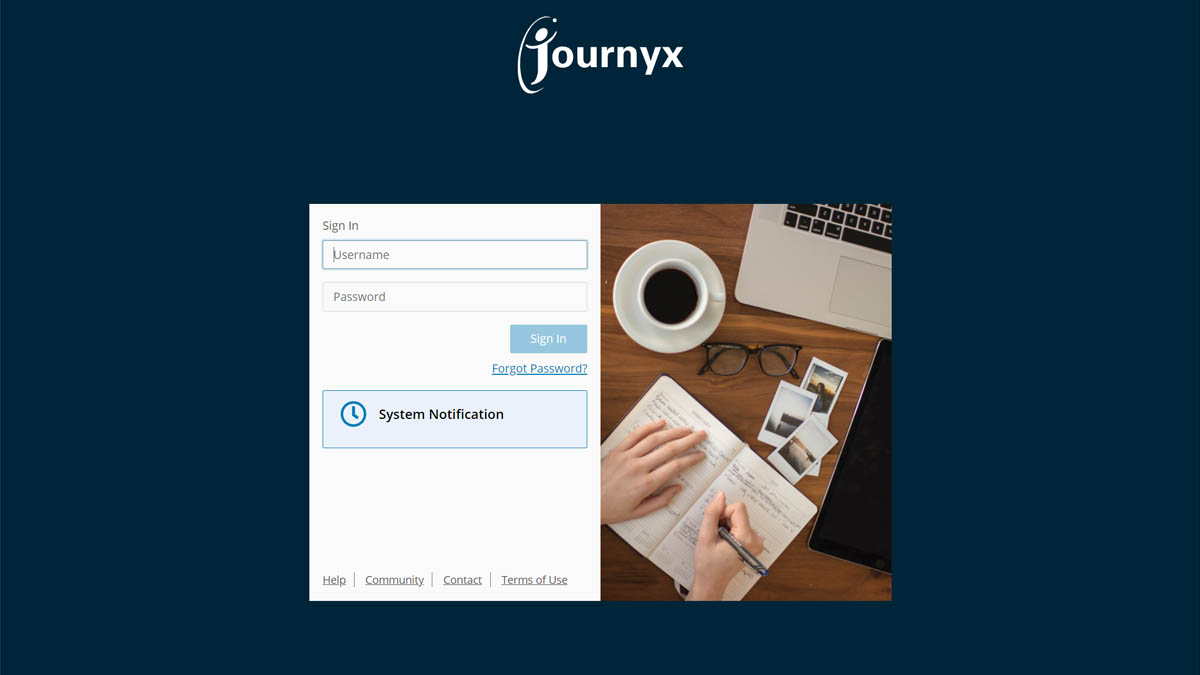
You can add content to the login screen: Change the logo and add notification text .
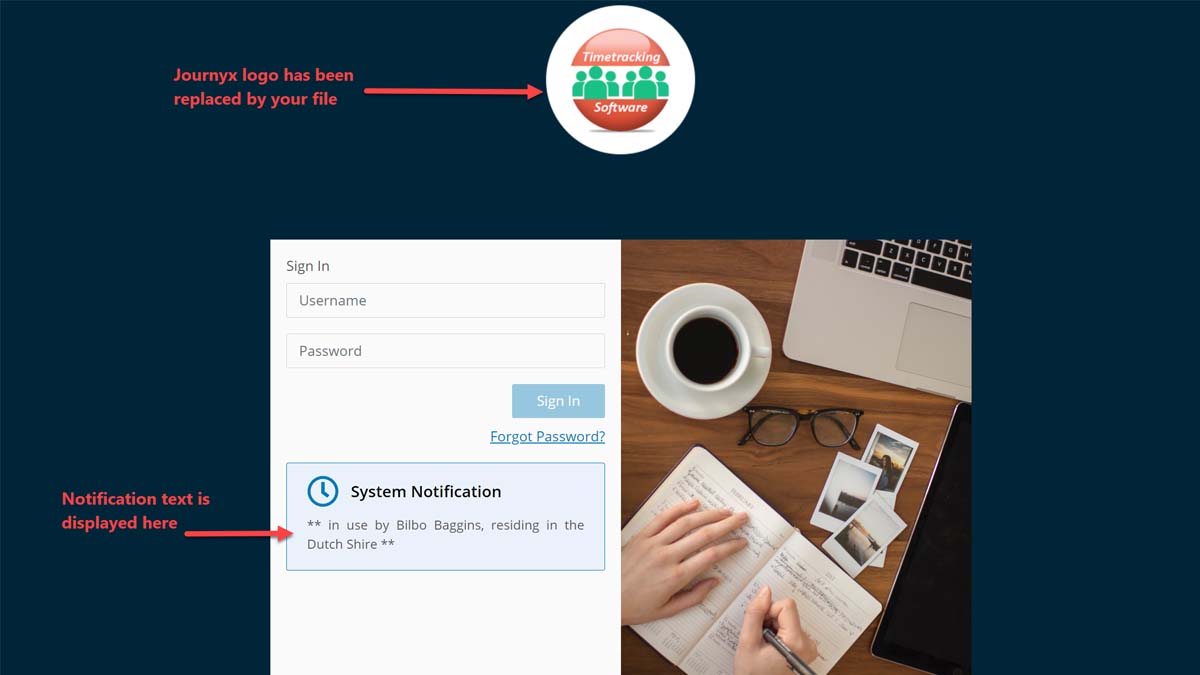
Here is a sample login screen where the Journyx logo has been replaced and additional text has been added to the screen (here is a screenshot of the default login screen before any changes).
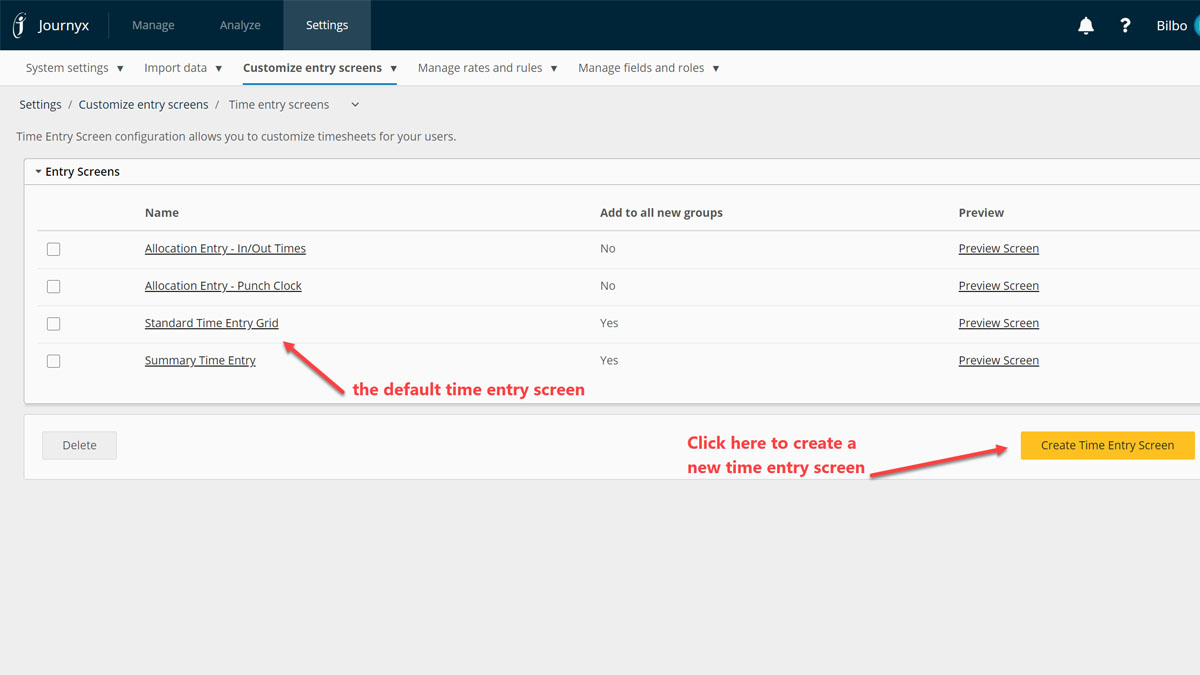
Time Entry Screens are located under Settings / Customize entry screens / Time entry screens. Time Entry Screens are the standard entry screens that users can utilize when logging their time. These screens are highly configurable in order to suit each organization's unique time tracking process.
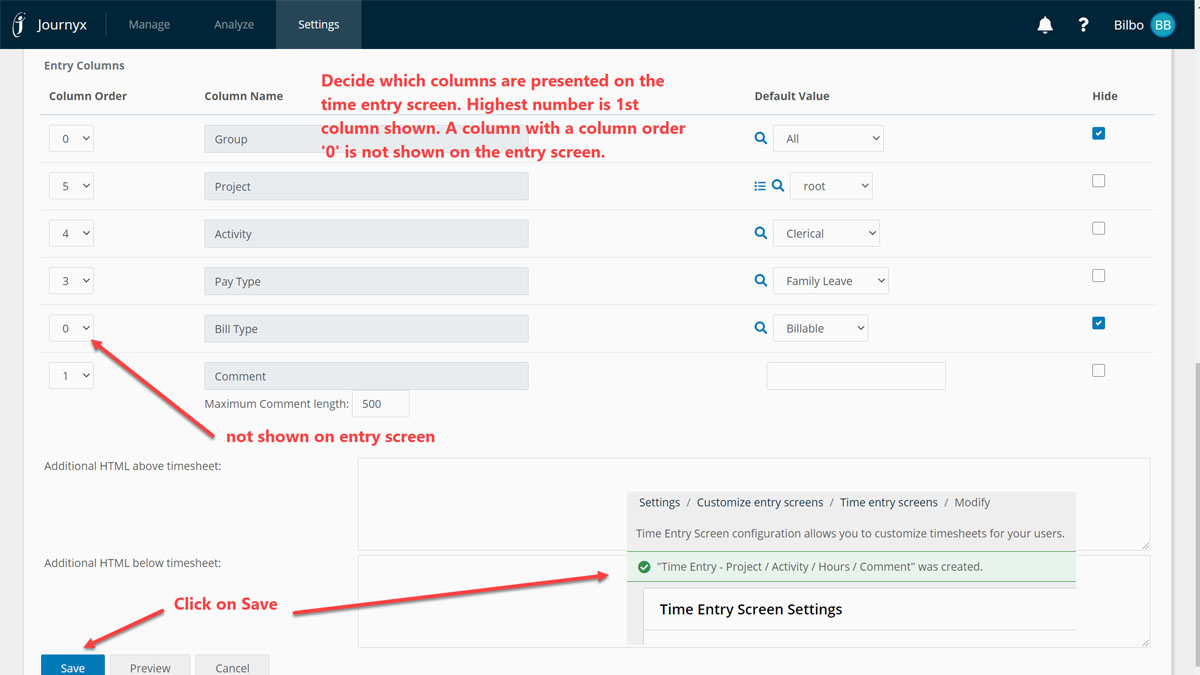
The default time entry screen 'Standard Time Entry Grid' shows all columns (default names 'Project', 'Activity', 'Pay Type', 'Bill Type' and 'Comment') and a weekly grid (starting on Sunday, ending on Saturday).
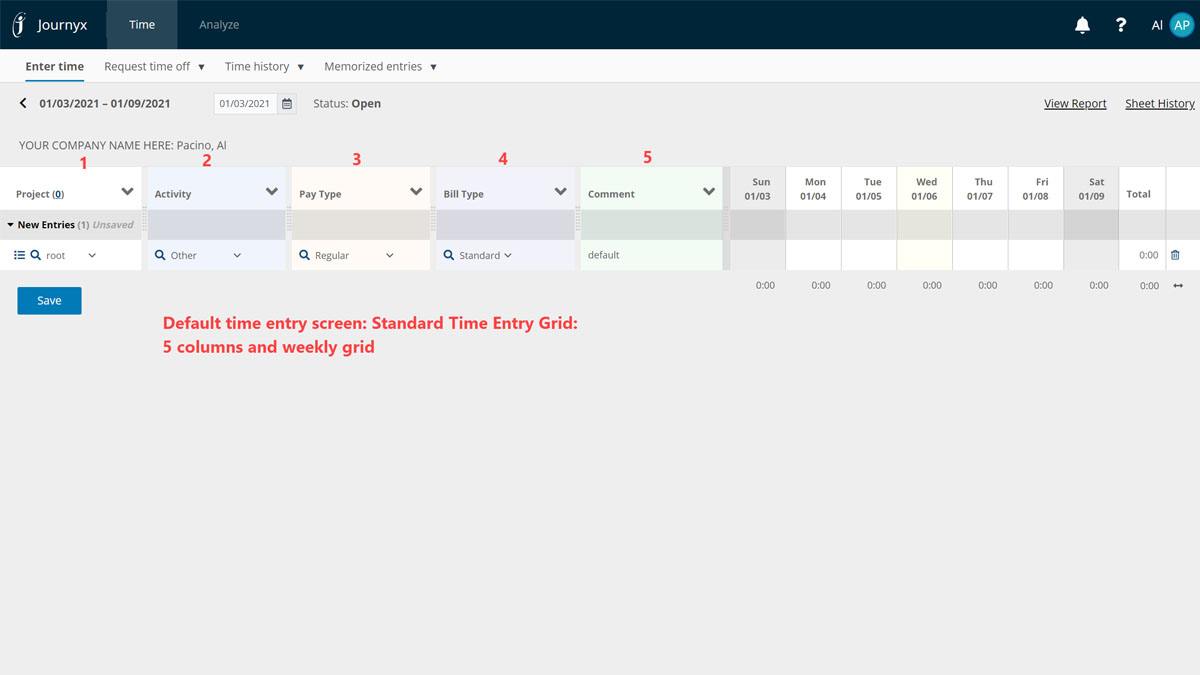
Default time entry screen
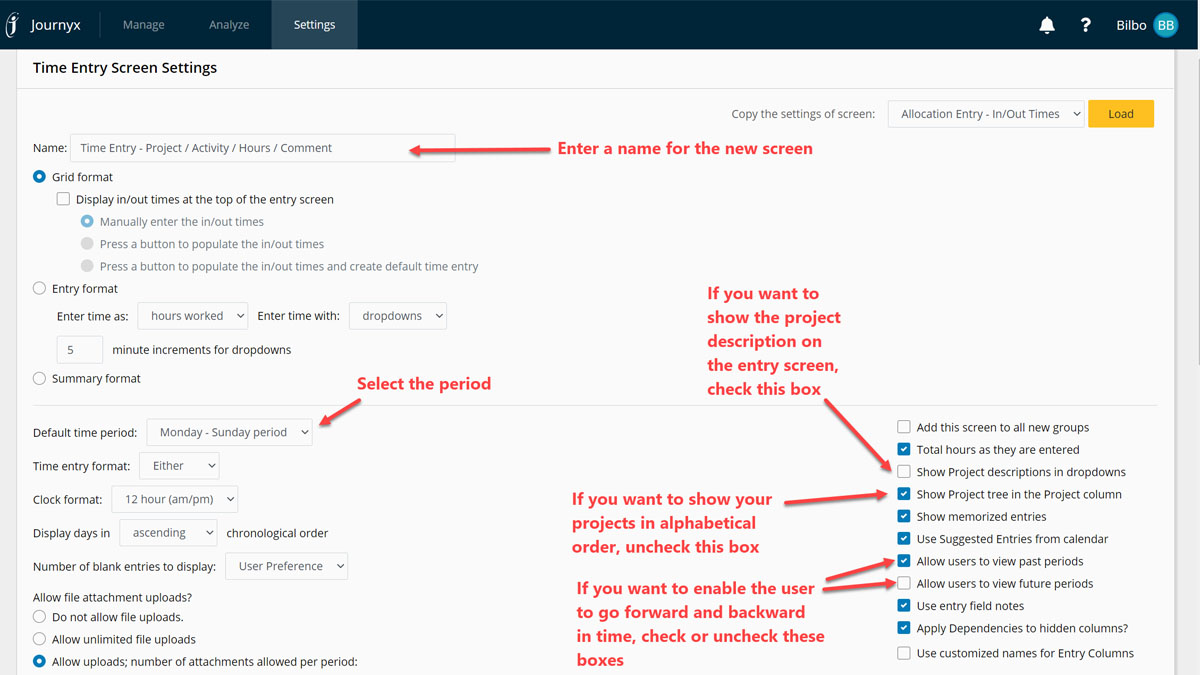
The column names, the number of columns and the period can be changed. You can use different time entry screens within your organization. Let's create a new time entry screen where we use only 4 columns (1 column is hidden on the entry screen) and a weekly grid period that starts at Monday (see Entry Time Periods on this webpage how to add a new weekly period before creating a new time entry screen).
Steps:
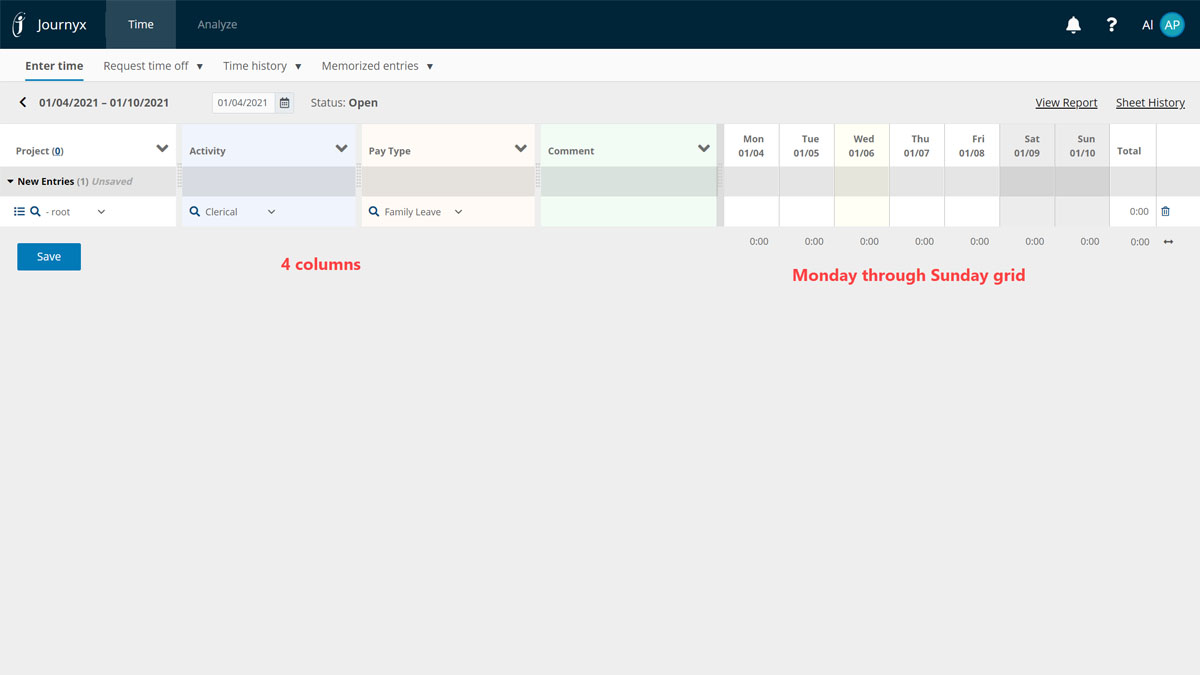
Newly created time entry screen
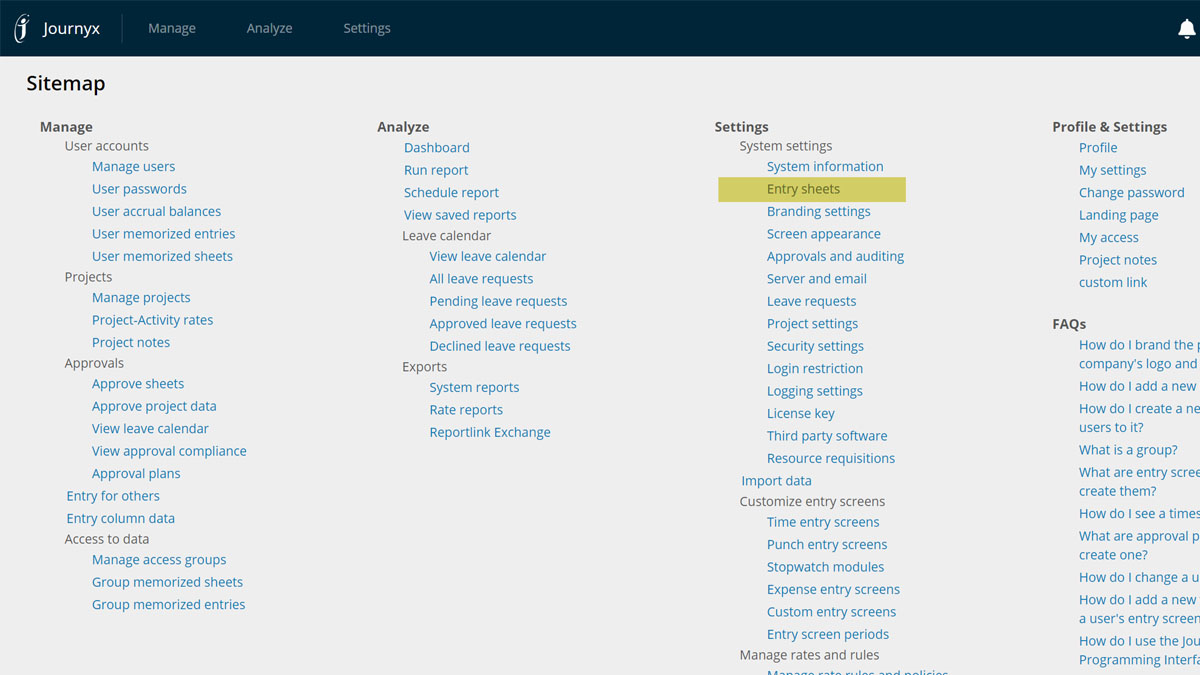
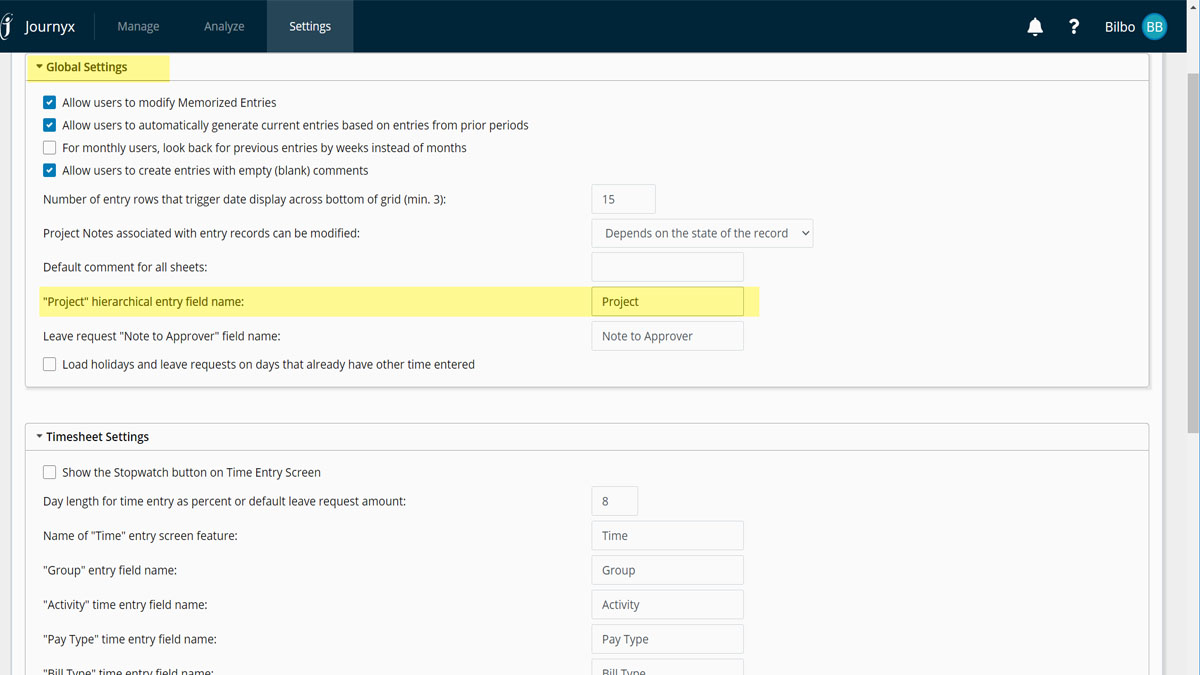
All the column names on the time entry screen can be changed. Go to Settings / System Settings / Entry Sheets.
Check out the 'Global Settings' section of the entry screen. Here you can change the default name of the 1st column ('Project').
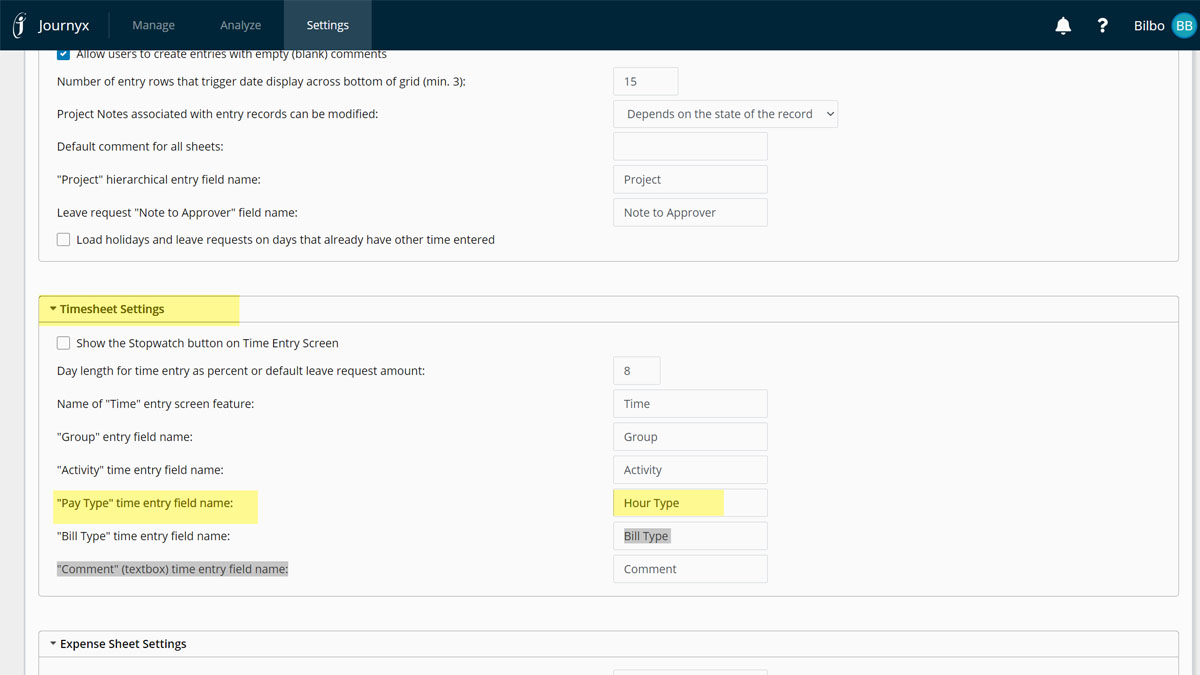
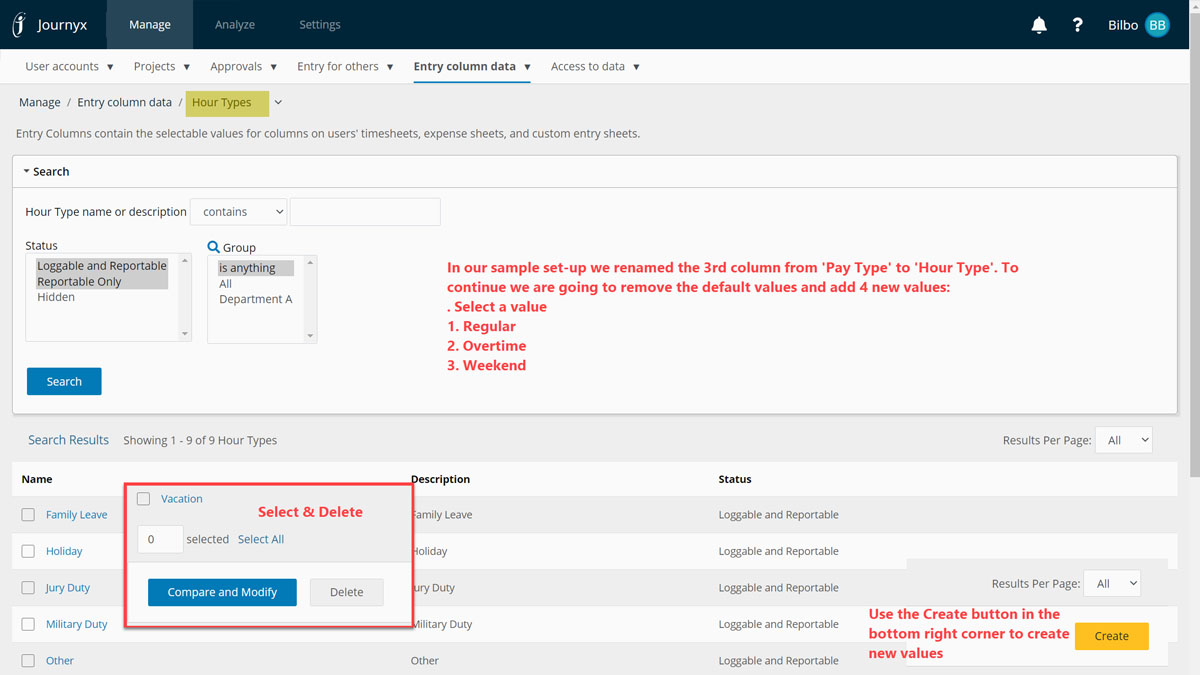
In the 'Timesheet Settings' section you can rename the other columns. In this sample the default name of the 3rd column has been changed from 'Pay Type' to 'Hour Type'. The intention in our sample set-up is to have 3 different hour types: 'Regular', 'Overtime' and 'Weekend'. We can use this for example to use different hourly rates for different hour types.
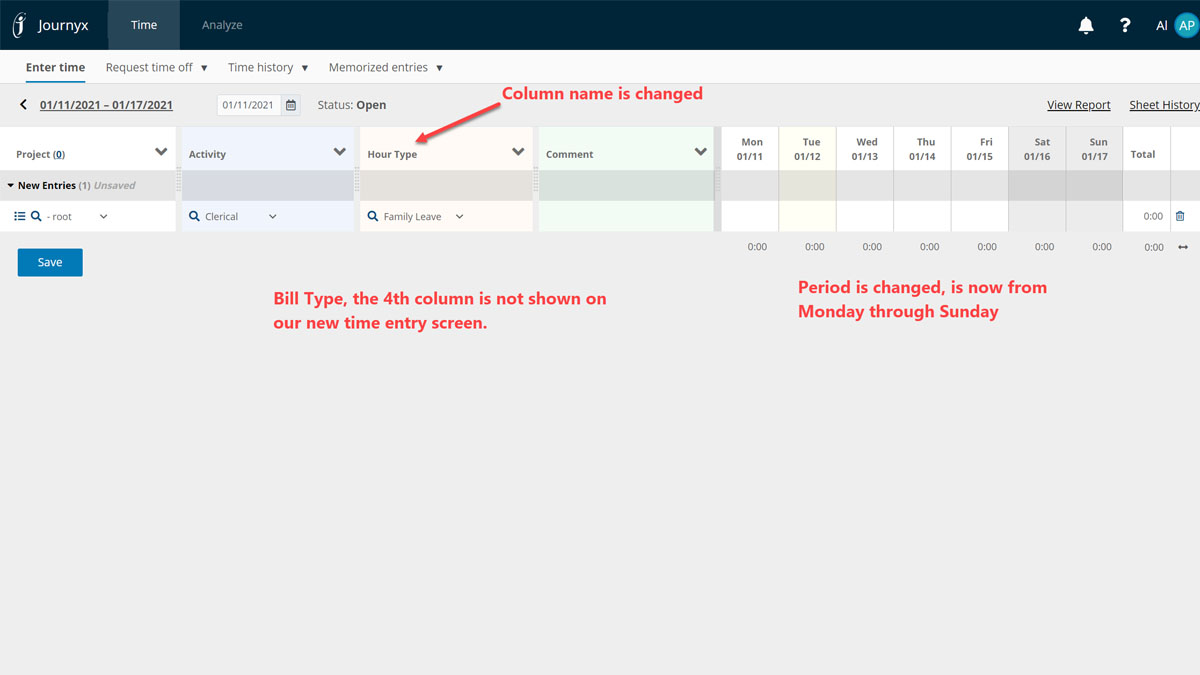
New time entry screen with custom column name
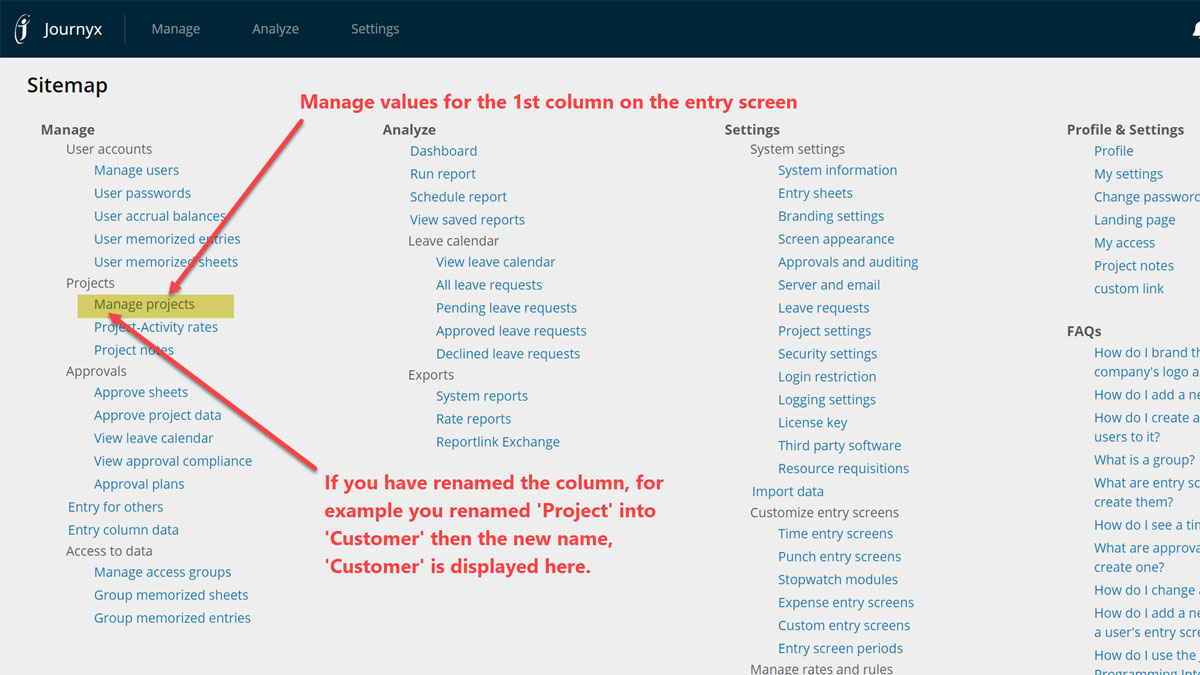
You can manage values for the 1st column ('Project') through the menu option: Manage / Manage Projects.
")
Add a Project demo
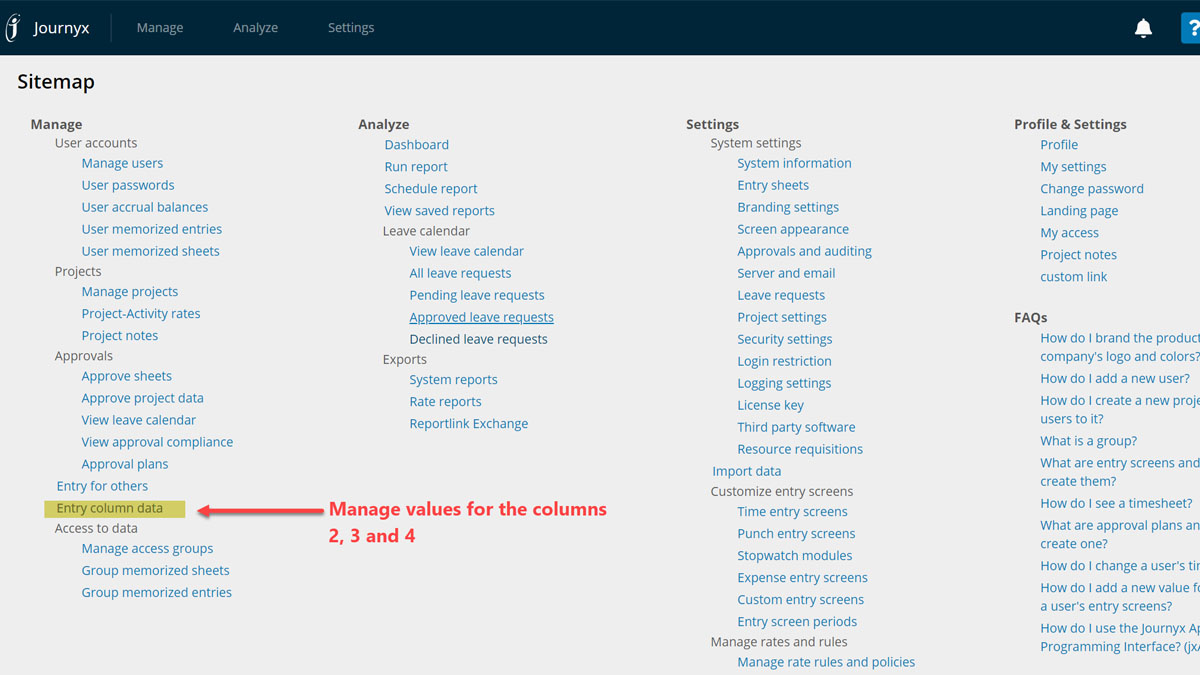
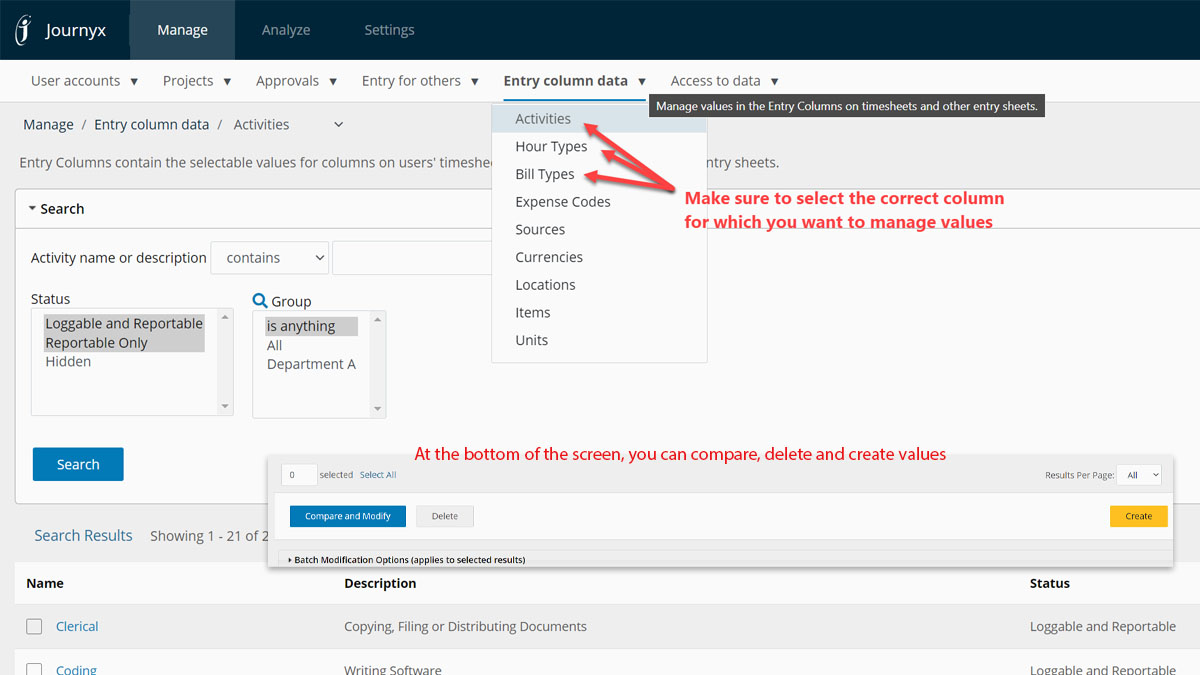
Values for the other columns (column 2 (default name 'Activity'), column 3 (default name 'Pay Type') and column 4 (default name 'Bill Type')) can be managed through the menu option: Manage / Entry Column data.
Make sure to select the correct column for which you want to manage the entries Manage / Entry Column data.
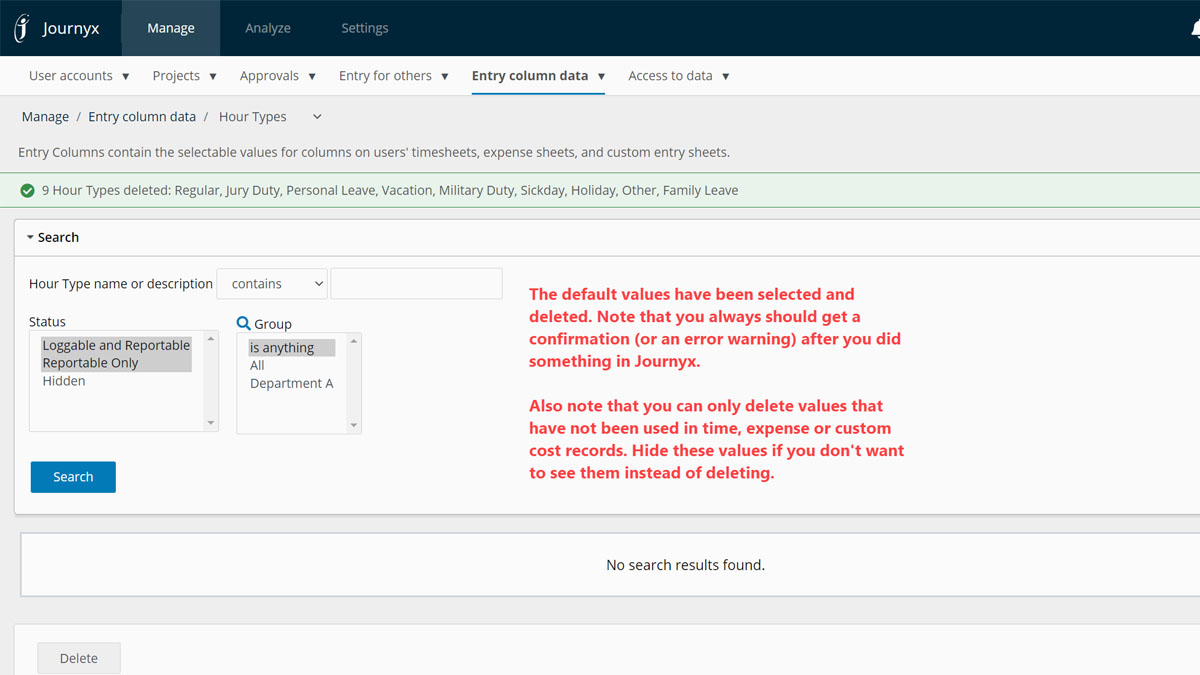
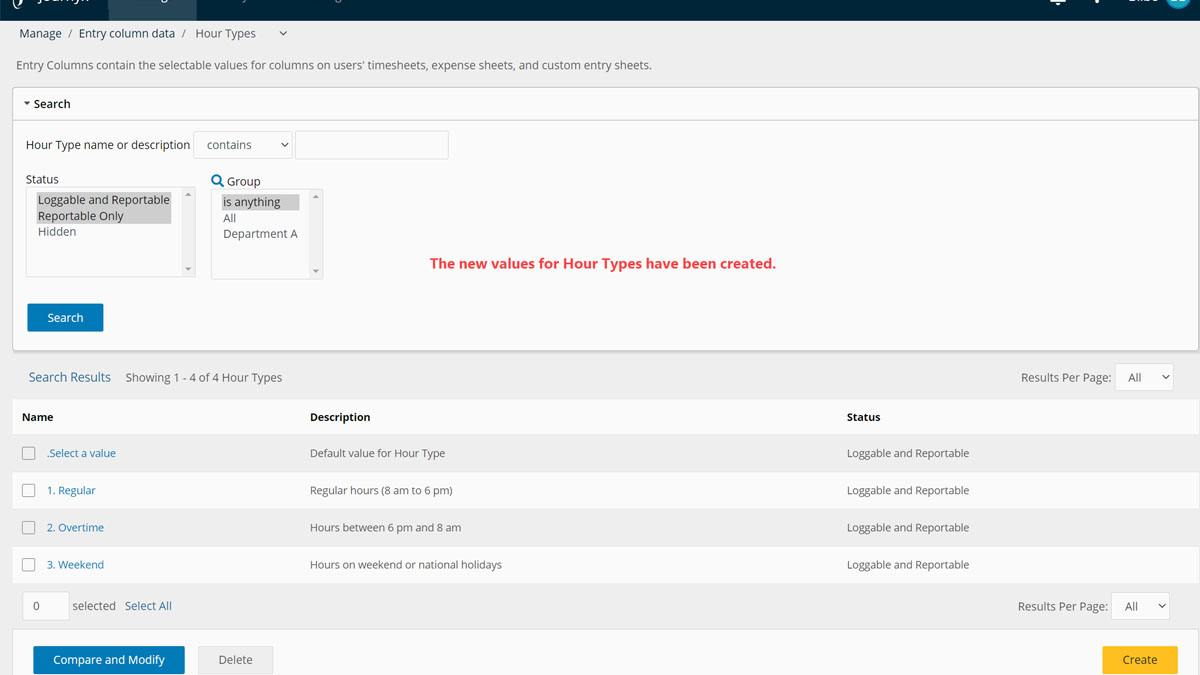
In our sample set-up we renamed the 3rd column to 'Hour Type'. To continue with this set-up we will remove the default values (you can delete or Hide (change the status on the value detail screen from 'Loggable and Reportable' to 'Hidden') and add 4 new values .
You can add fields to the Journyx database. These fields are used for reports (and in case if the field is a drop down list, can be added to some management screens to help you search the contents). You can NOT add a custom field to an entry screen (time-, expense- or custom costs entry screen). You can add custom fields to the following Journyx tables (Note: if you have renamed the columns then the names may differ from your set-up):
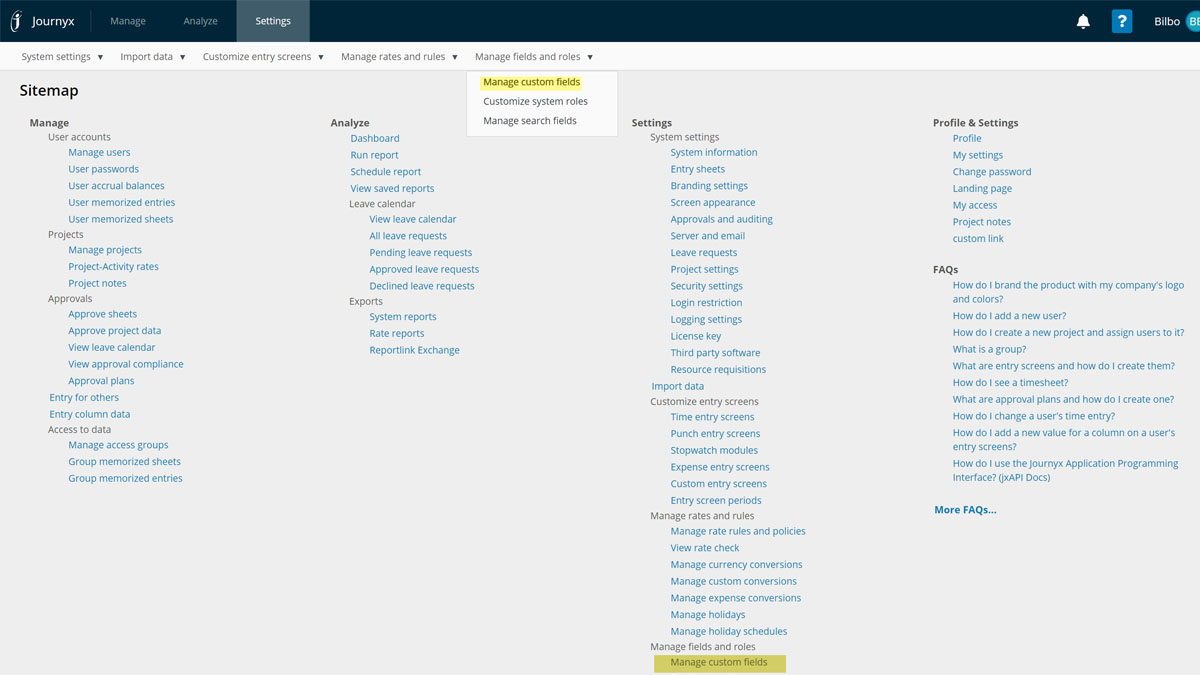
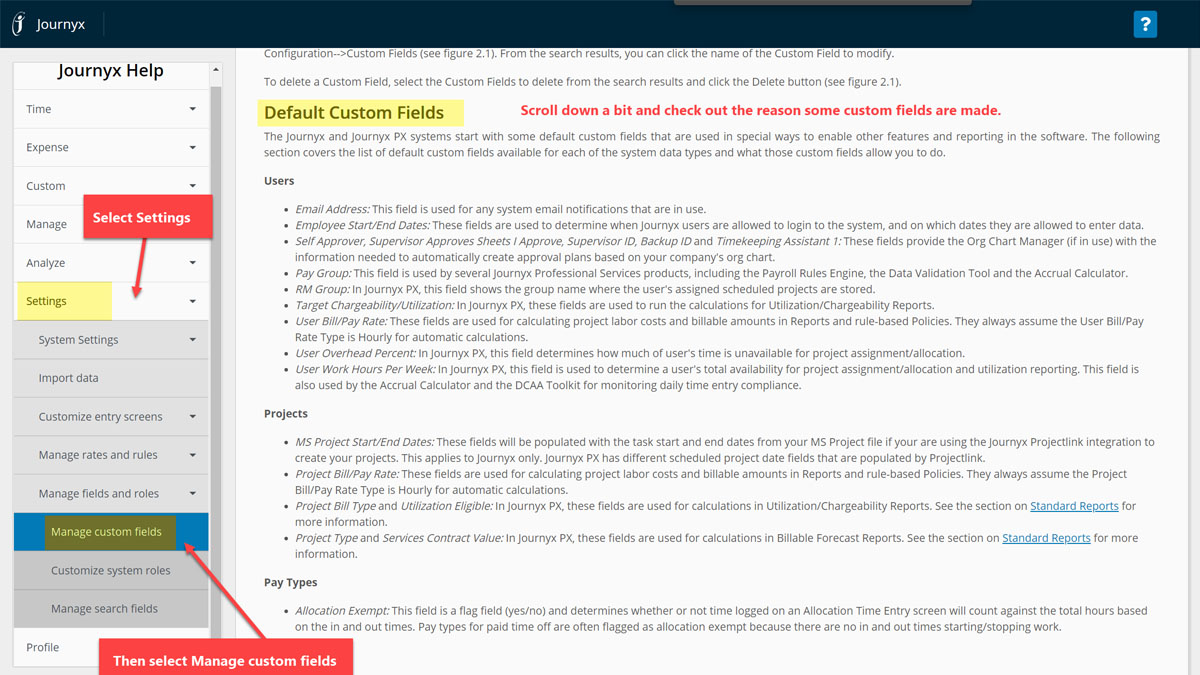
Custom Fields is located under Settings /Manage fields and roles / Manage custom fields.
There are five data types available for Custom Fields:
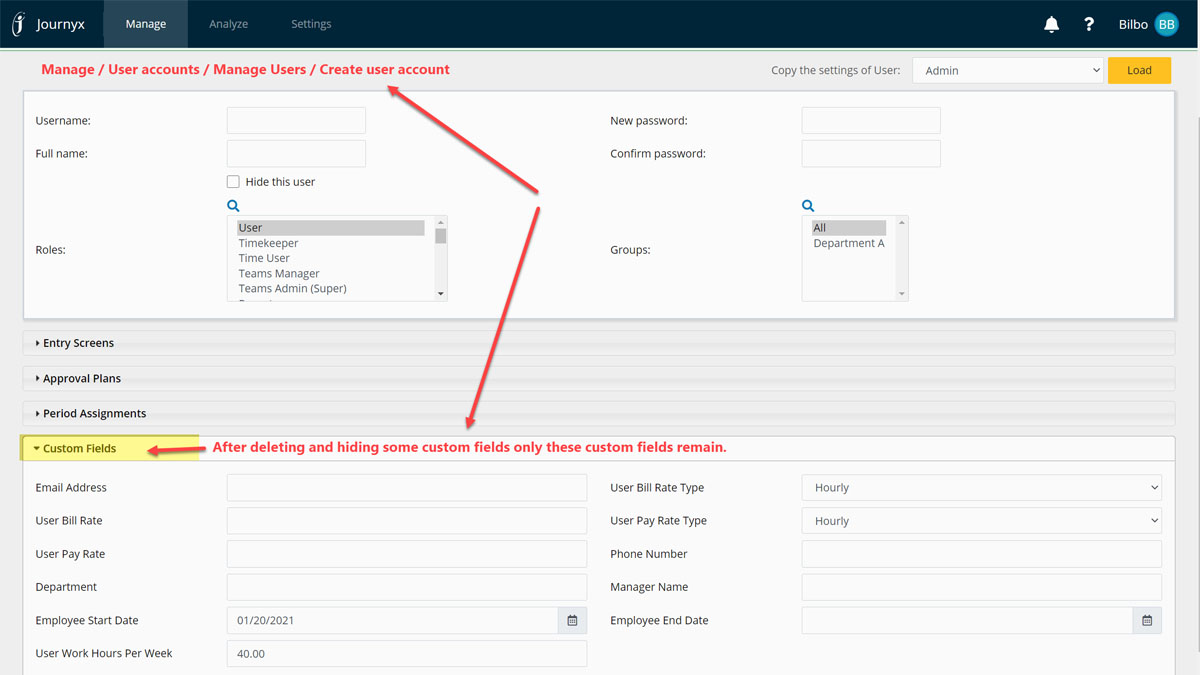
Let's have a closer look at the default custom fields in the user table. Go to the user management and click on the Create button. Next scroll down to the custom fields section. As you can see 26 custom fields have already been defined. The Help text of the Custom Fields Screen explains the use of these default custom screens.
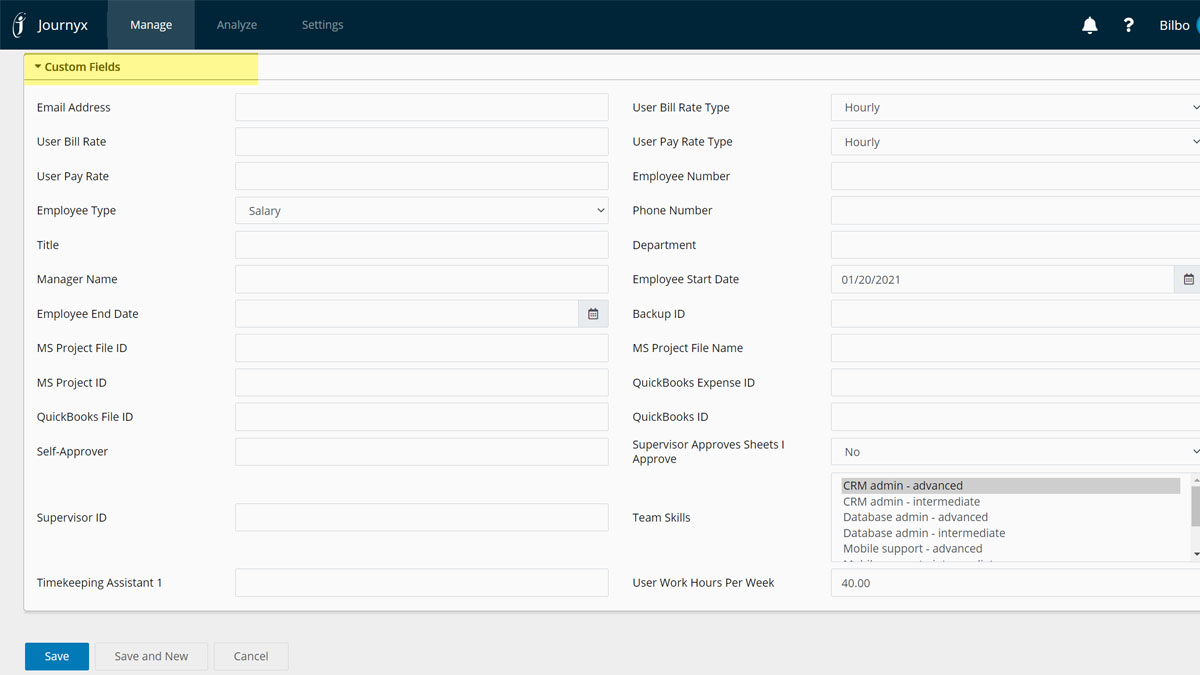
There are 26 user custom fields defined (default)
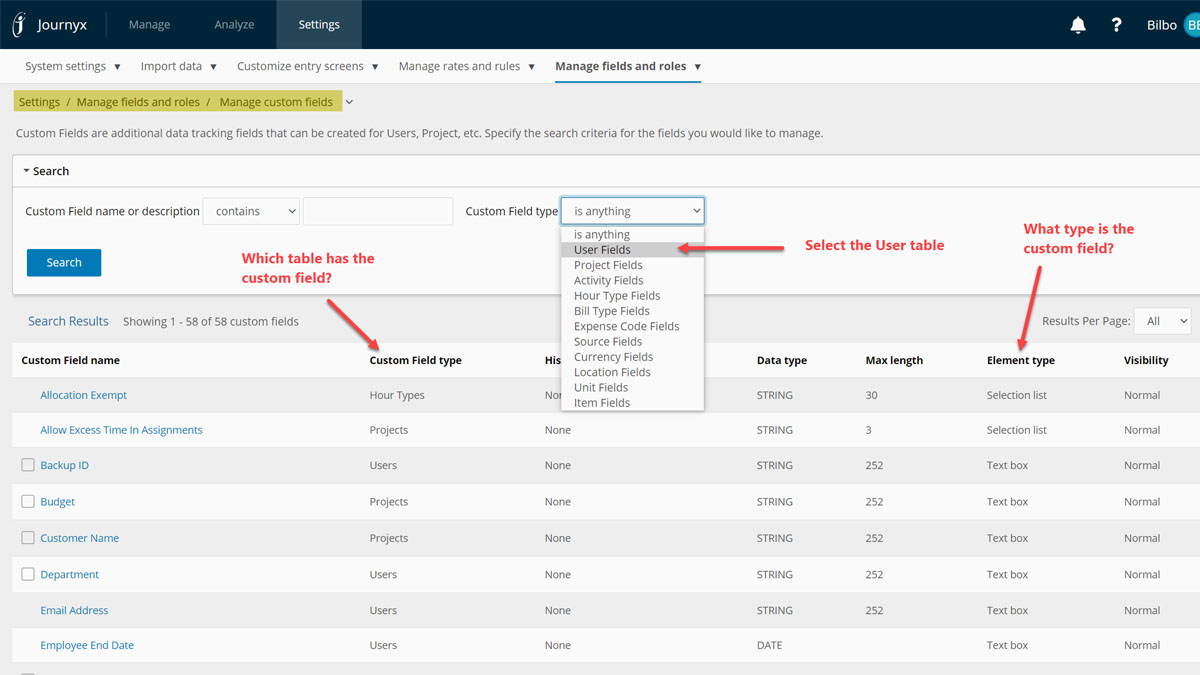
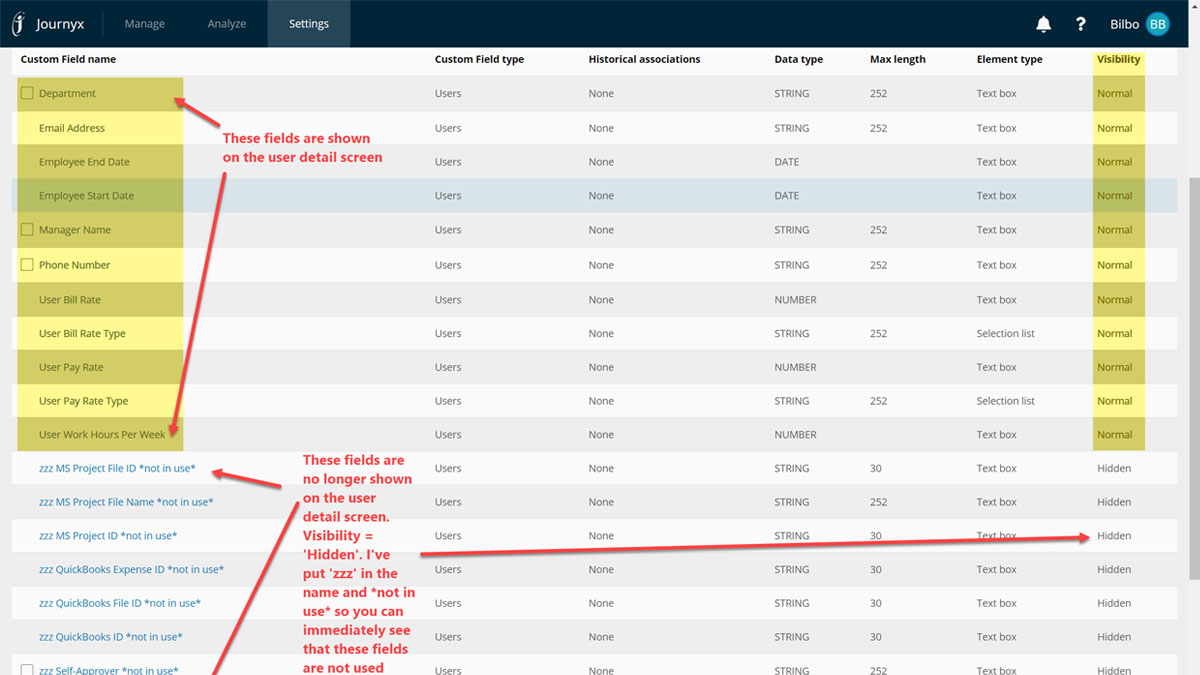
Select Manage Custom Fields and the custom fields are shown alphabetically. Let's look at the user custom fields. Use the search criteria to only show the custom fields that are defined for the user table (select 'User Fields' in the pull down field Custom Field Type and click on the search button).
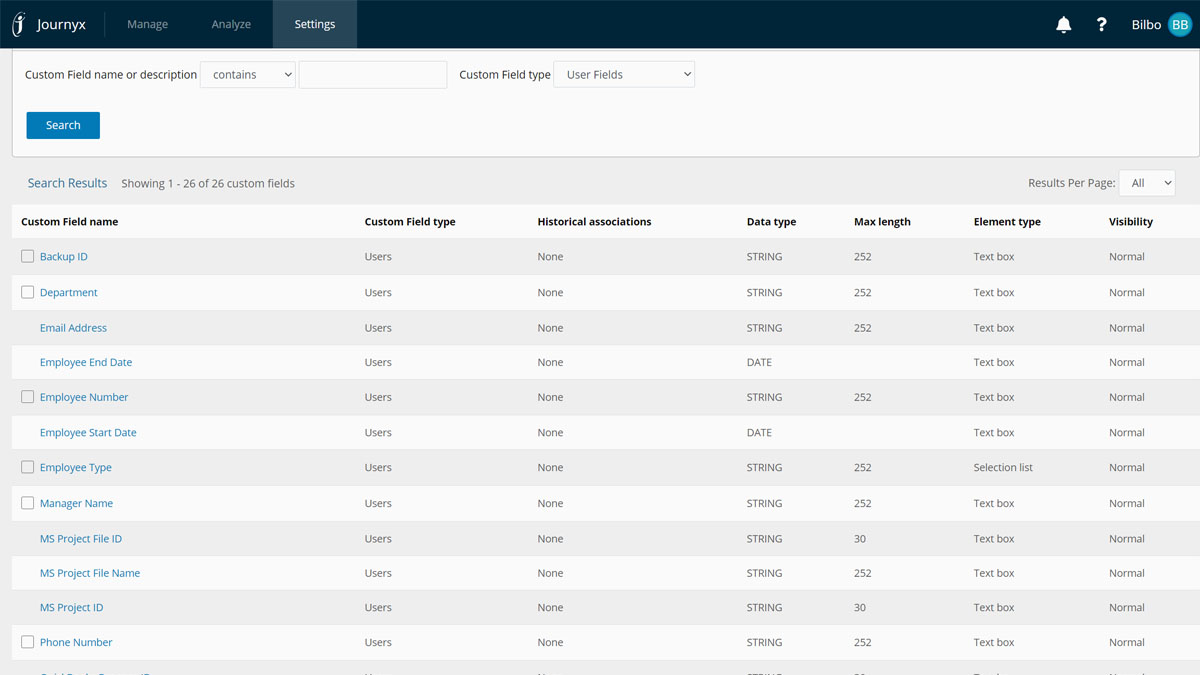
The default user custom fields
As you can see on this screen some custom fields can not be deleted. If you're not using these fields, hide these to remove them from the user detail screen.
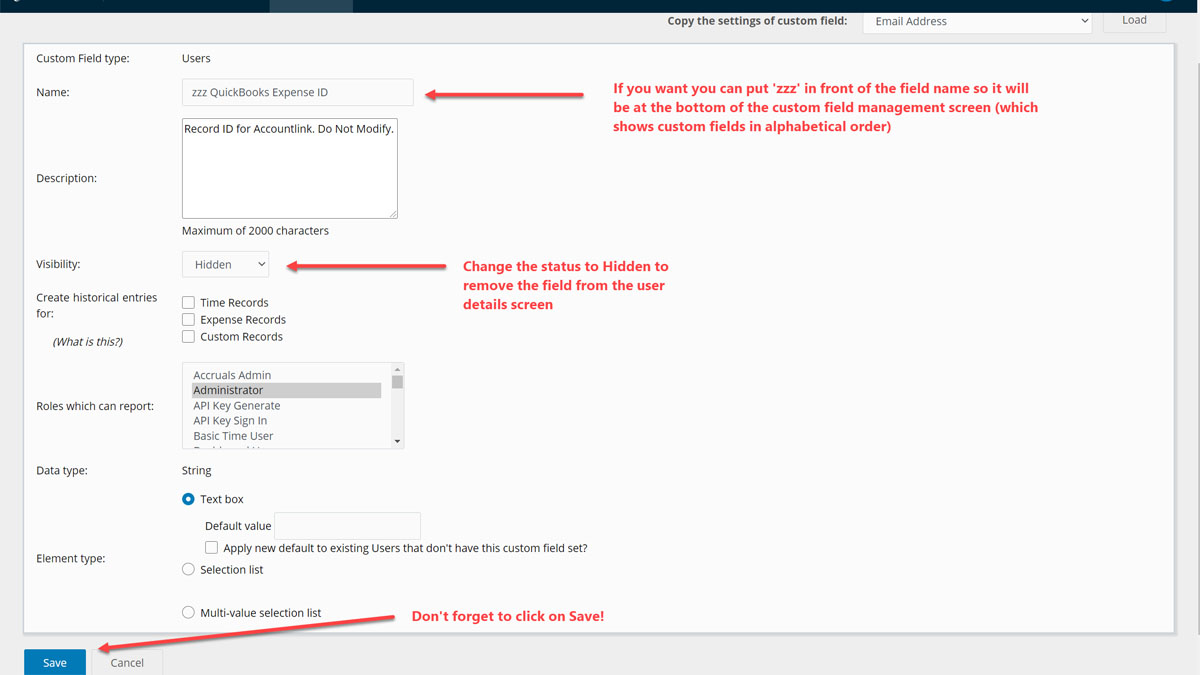
Managing a custom field is easy. Select the one you want to change (click on the name) and the custom field detail screen will open. In this screenshot the name and the visibility of the custom field is changed. Put 'zzz' in front of the name to display the custom field at the bottom of the custom field management screen. Change the visibility to 'Hidden' to remove the custom field from the user management screen.
Here is the custom fields management screen (search on User Fields) again after the changes (some files deleted, some made 'Hidden'). If we go back to the user management screen (Manage / User accounts / Manage Users / Create user account) you will see the remaining user custom fields.
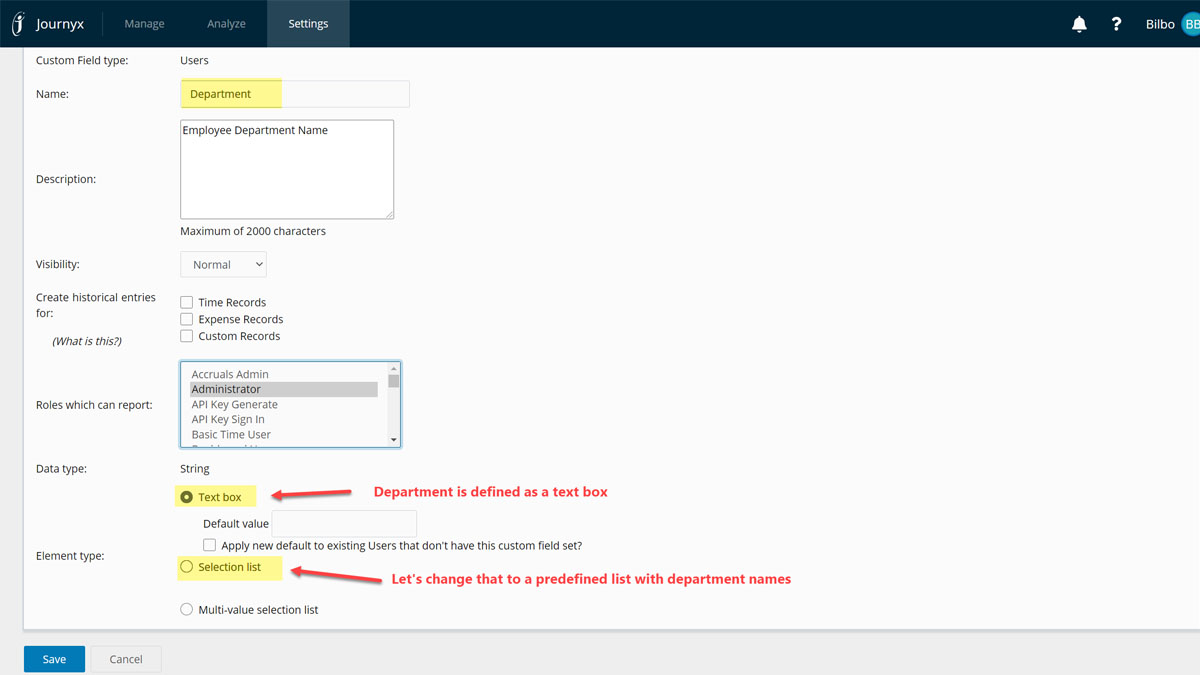
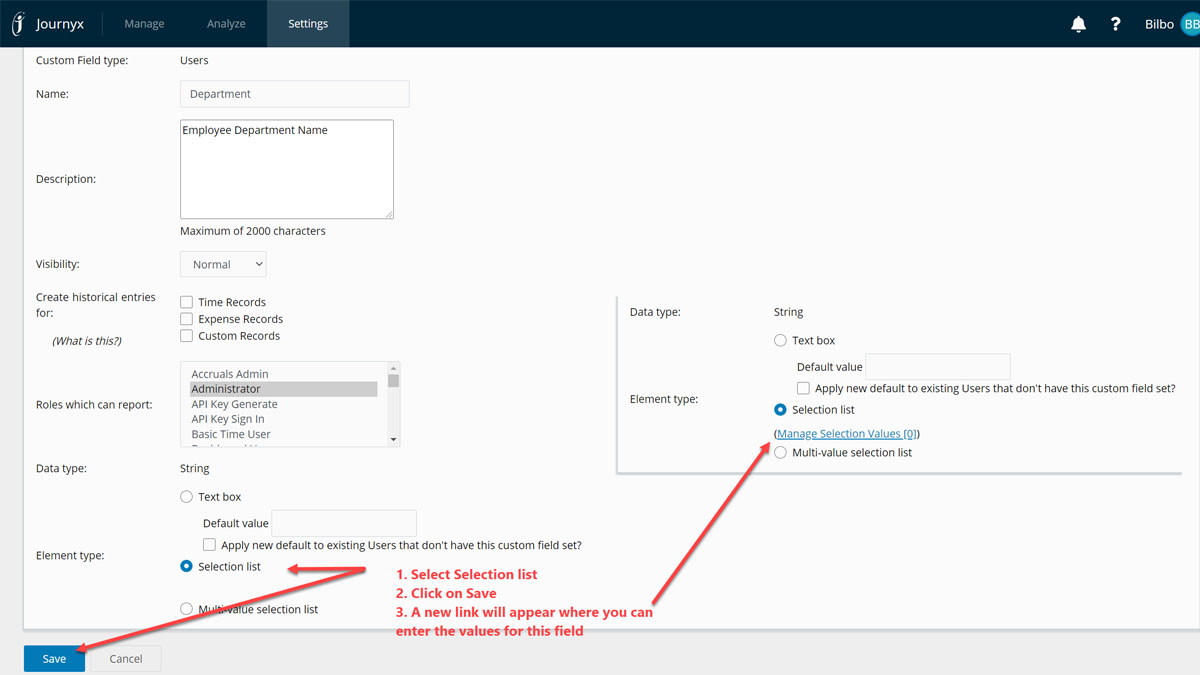
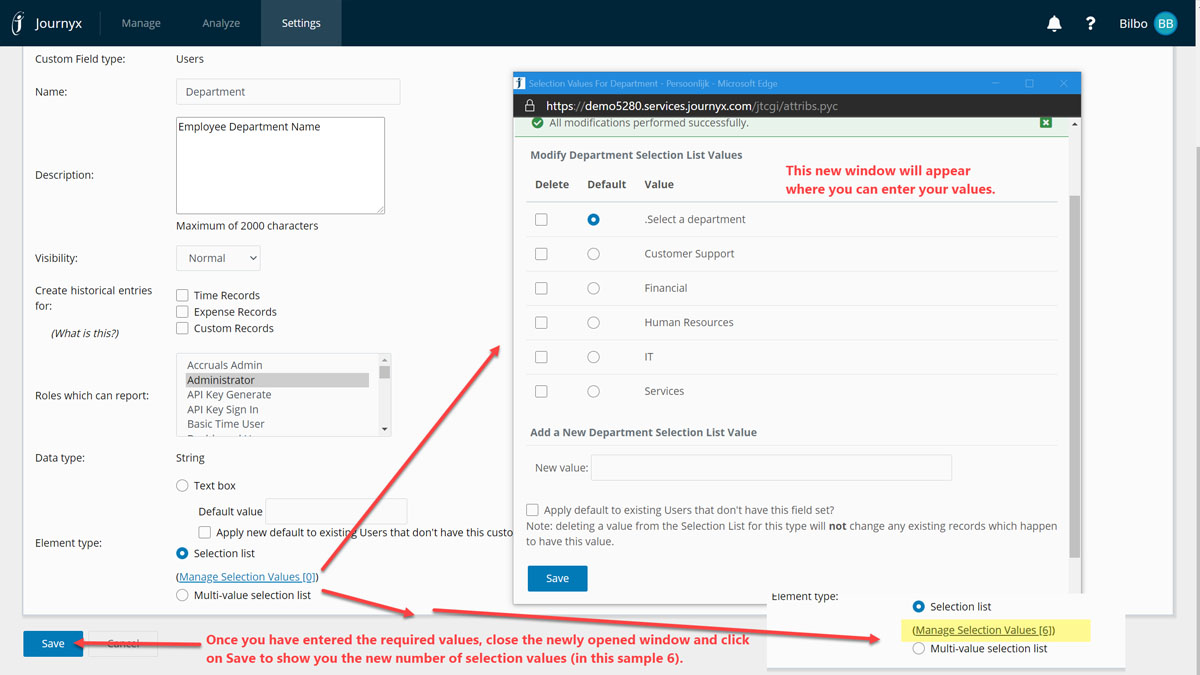
In our sample you can see that the custom field department and manager are text fields. Their data type is 'Textbox' which means that you can enter text without any validity checks. For example, you can enter 'Services' as the department or 'services'. Let's change the data type of this field to 'Selection list' so that you can choose the department instead of having to enter the full name. Click on the 'Manage Selection Values', a new window will open where you can enter the desired values for this custom field.
After changing the data type and entering new values for the selection values you will see the changes when you go back to the user detail screen. You will see that you can no longer enter text in these fields but can only select from a list of values. This will make sure that the content of the field is always written in the same style.