Approvals

Create approval workflows

Approval workflows

configuration

Approval Plan

Timesheet Approval Plans allow you to create different approval workflows for users who submit their timesheets, expense sheets, or custom entry sheets after each period. Users who have been assigned to Approval Plans will be required to submit their sheets to be approved by the approvers specified in the Sheet Approval Plan.

Approval Plan (image:denise jans @unsplash)

Approval plan demo

Configuration

Using no approval plan

If you don't set up approval plans then every sheet will remain 'open'. This means that the user can change any entry any time. Even if you don't have approvers (i.e. (project-)managers) in your company, it is probably wise to prevent unwanted changes to the time entries. For example, if you have run your reports (for invoice or management purposes) and employees can still change their entries, then your whole report can show incorrect data. Worst case, any time you run a report, it can show different results.

Configuration

Organization Chart Manager

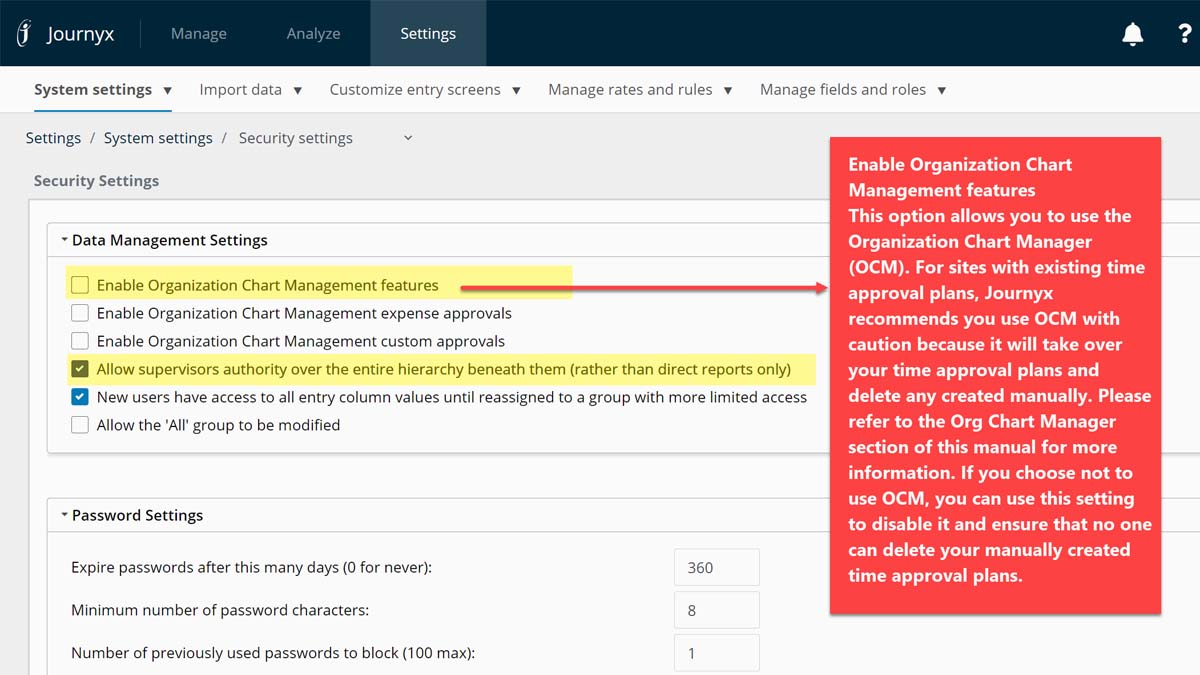
The Organization Chart Manager (OCM) is a configuration tool that automates the set up of a top-down reporting structure and bottom-up approval structure for your organization based on an organization chart (org chart) that you can create and manage in the system. If you have a large number of users, OCM facilitates the process of creating and maintaining their approval plans, as well as the ability to report on them.

The Organization Chart Compliance Viewer (OCV) provides a complete view of time approval status and compliance based on the hierarchy relationships in your org chart. The compliance viewer allows you to quickly locate parts of the organization that are out of compliance, get sheets approved or contact others to take action. The compliance viewer can be used with or without OCM. It will show compliance data regardless of whether the corresponding approval plans were created manually or by OCM.

Important notes:

  • You cannot use time approval plans that were manually created in tandem with OCM-created approval plans. OCM completely manages the time approval plan list when it is in use. If you plan to create your time approval plans and assign them to users manually, or you already have your time approval plans in place, you have the option to disable OCM under Configuration --> System Settings --> Security. Disabling OCM does not block you from using OCV for reporting on your manually created approval plans.
  • The OCM can also create expense and Custom sheet approval plans. Those plans, however are limited to the same approval settings as the OCM created time approval plans. That is they must use the same number of levels and same approvers as the time approval plans.
  • You cannot use the Organization Chart Compliance Viewer with the Expense and/or Custom approvals since those are generally not submitted every period.
Configuration

Approval Plan general settings

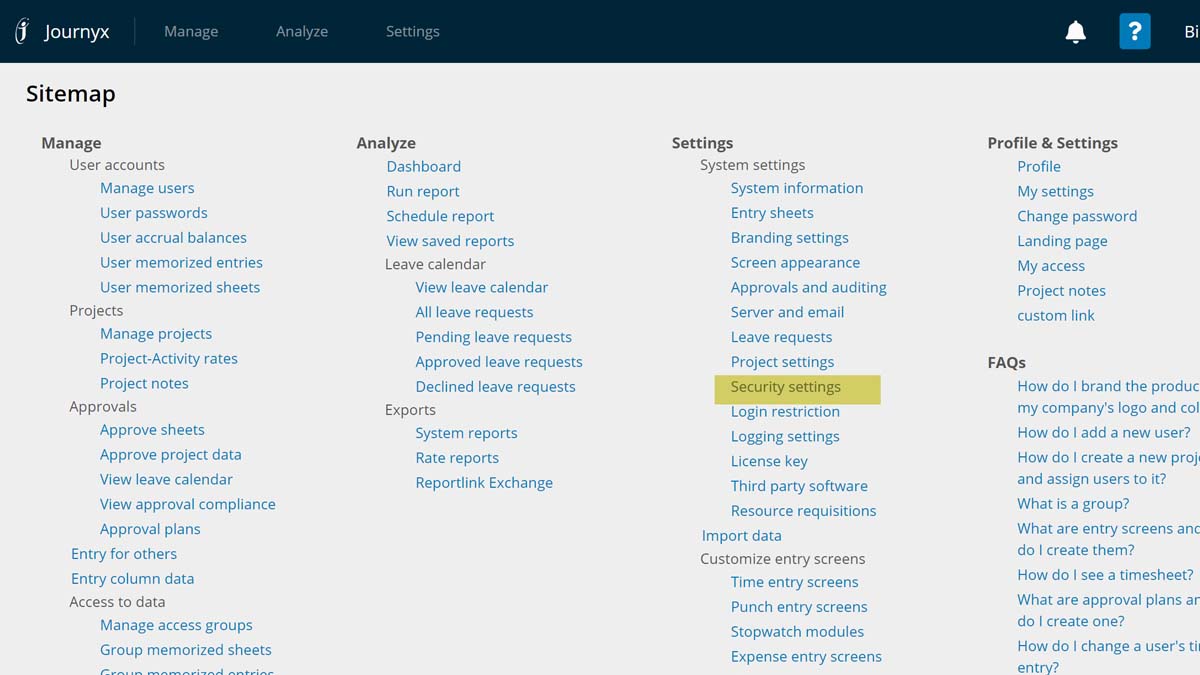
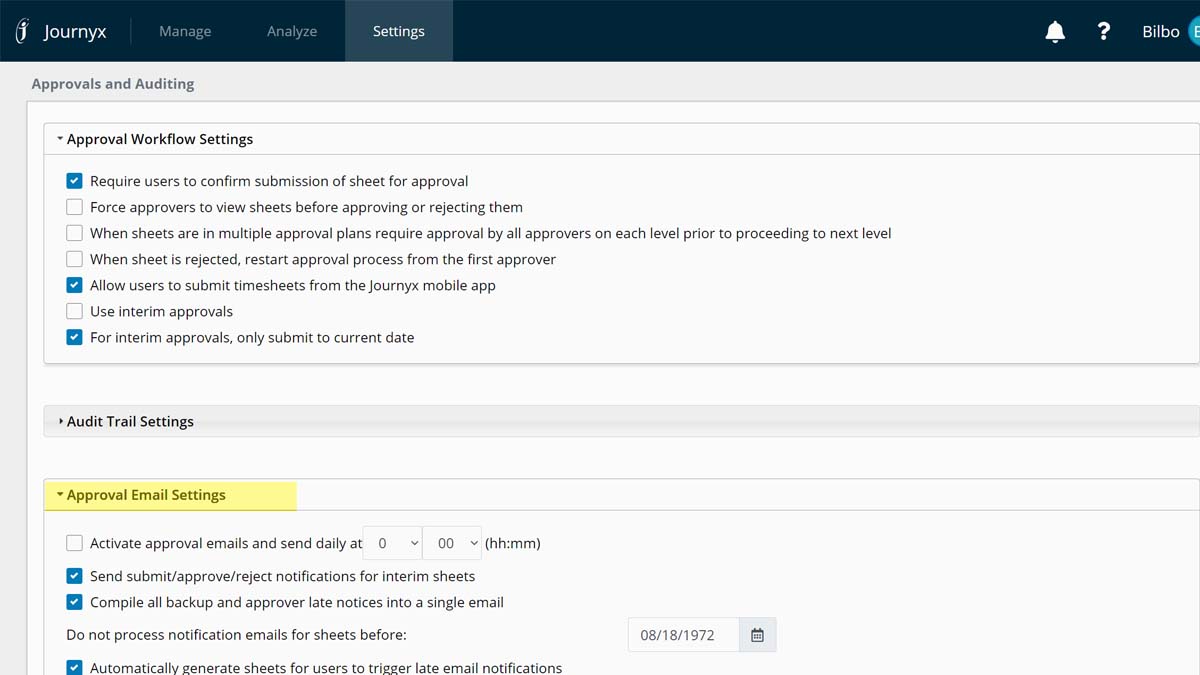
There are several menu options related to the approval workflow settings: Entry Screen Period Management is located under Settings / Customize entry screens / Entry screen periods. Before users can begin logging time, expense, or custom entries, the system administrator must first create and assign the Periods that the organization will be using.

Notification Settings (image:denise jans @unsplash)

Notification settings

Configuration

Approval Plan management

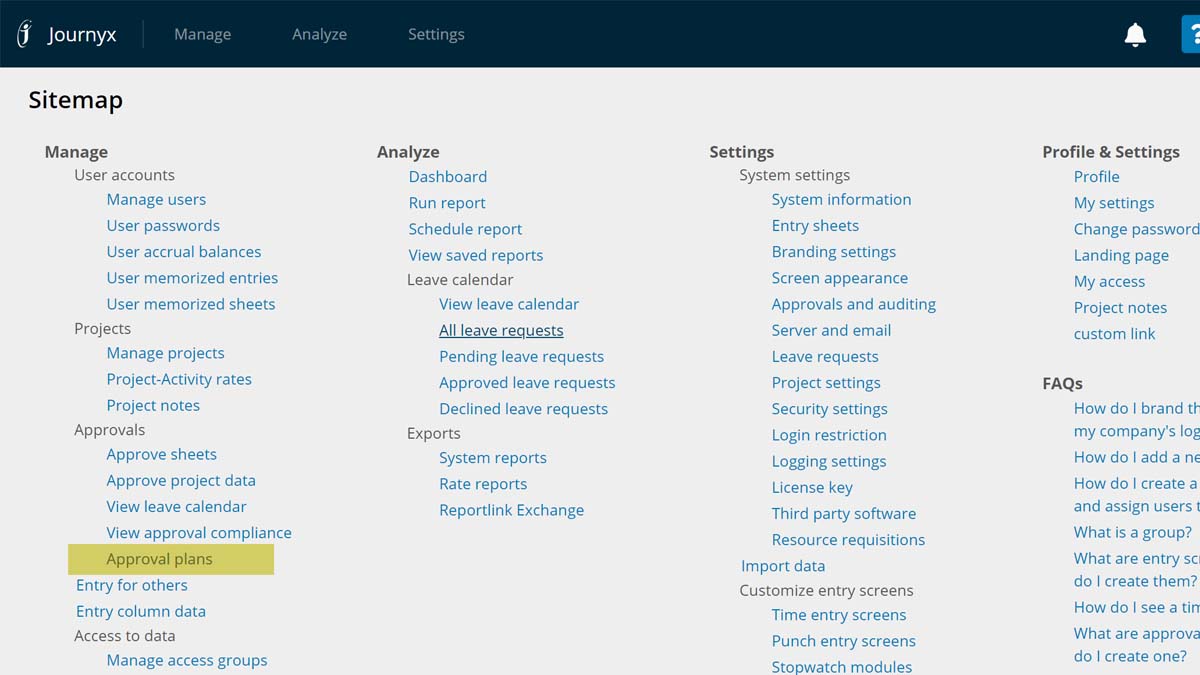
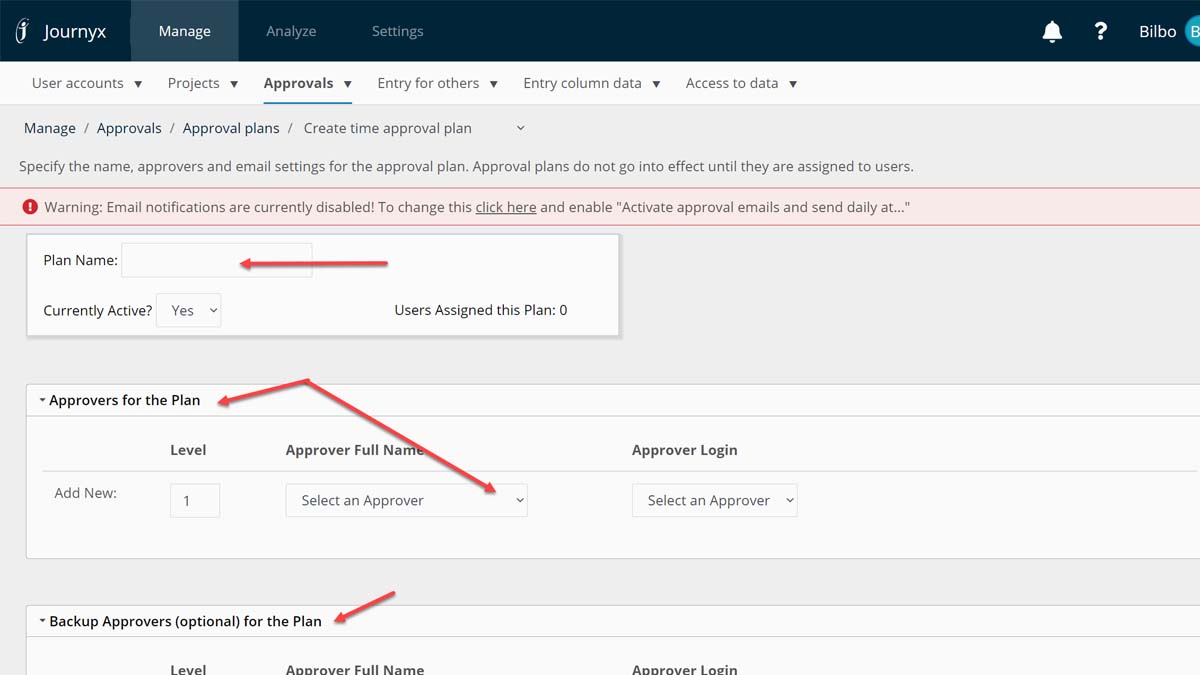
To create a new Time Approval Plan, select the Create time approval plan option from the Manage / Approvals / Approval plans menu. This will direct you to the Create time approval plan screen where you will configure the settings of the new Approval Plan. You define the following in an approval plan:

  • The person or persons who approve the submitted sheet. You can define multiple approvers and multiple levels of approval.
  • Backup approvers in case the sheet is not approverd or rejected within the timeframe you sepcified in the approval plan.
  • Within the Email Settings section of Approval Plans, you can view and manage the different emails that can be sent to approvers and users who have been assigned to the Approval Plan. The various Email Settings are detailed below.
    • Enable user notification of rejection
    • Enable user notification of approval
    • Enable notification of users before a sheet is due to be submitted
    • Enable notification of users when a sheet is late being submitted
    • Enable approver notification of submit
    • Enable approver notification of resubmit
    • Enable notification of approvers when a sheet is late being submitted
    • Enable reminder email to approvers when they have sheets submitted to them which require approval
    • Enable backup approver notification

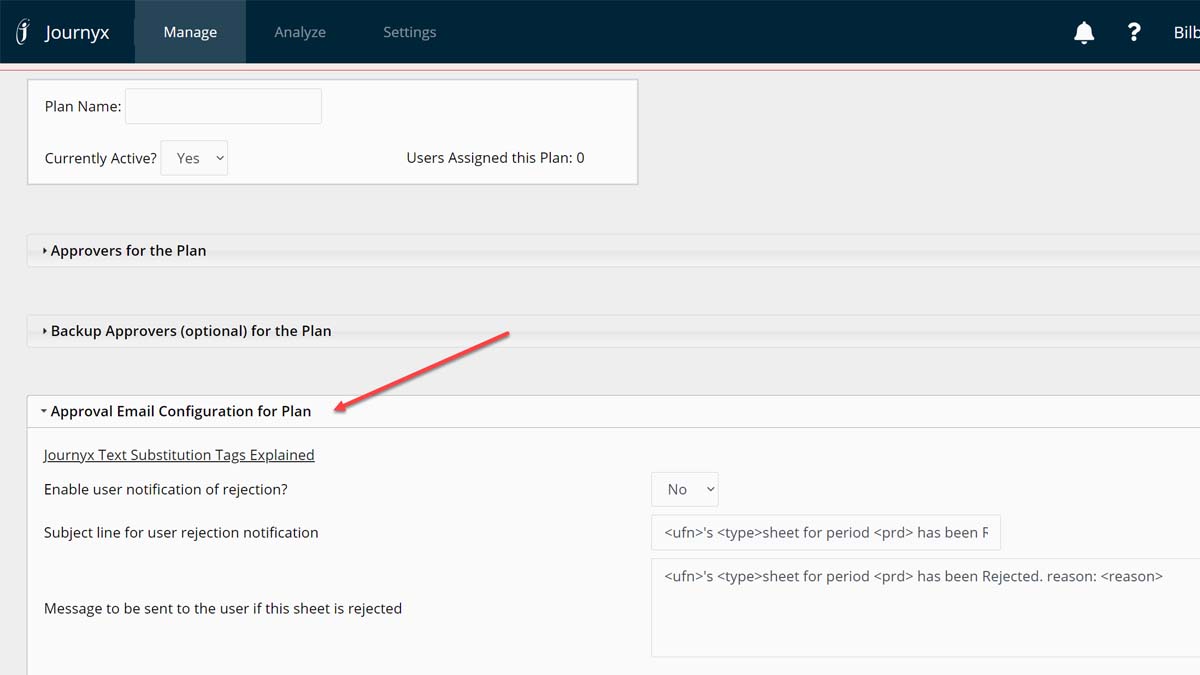
    The Email Setting fields for subject lines and messages accept plain text, HTML tags, and a selection of 'tricky tags' that pull information directly from the system database.

    Tricky Tag Information

    • < uid > : Displays the username of the user who submitted the sheet for approval
    • < ufn > : Displays the full name of the user who submitted the sheet for approval
    • < uem > : Displays the email address of the user who submitted the sheet for approval
    • < uphn > : Displays the phone number of the user who submitted the sheet for approval
    • < rjid > : Displays the username of the approver rejecting the sheet
    • < rjem > : Displays the email address of the individual rejecting the sheet
    • < rjphn > : Displays the phone number of the individual rejecting the sheet
    • < aprid > : Displays the username of the final approver
    • < aprfn > : Displays the full name of the final approver
    • < aprem > : Displays the email address of the final approver
    • < aprphn > : Displays the phone number of the final approver
    • < baid > : Displays the username of the backup approver
    • < bafn > : Displays the full name of the backup approver
    • < baem > : Displays the email address of the backup approver
    • < reason > : Displays the rejection reason for the submitted sheet
    • < prd > : Displays the period of the submitted sheet
    • < type > : Displays the sheet type submitted (time, expense, or custom entry)
    • < link > : Displays a link directly to the sheet that is the subject of the notification
    • < link=customlink > : Displays custom text as a link directly to the sheet that is the subject of the notification (when custom text is inserted in place of "customlink" and the system email format is set to HTML)

Set-up menu options

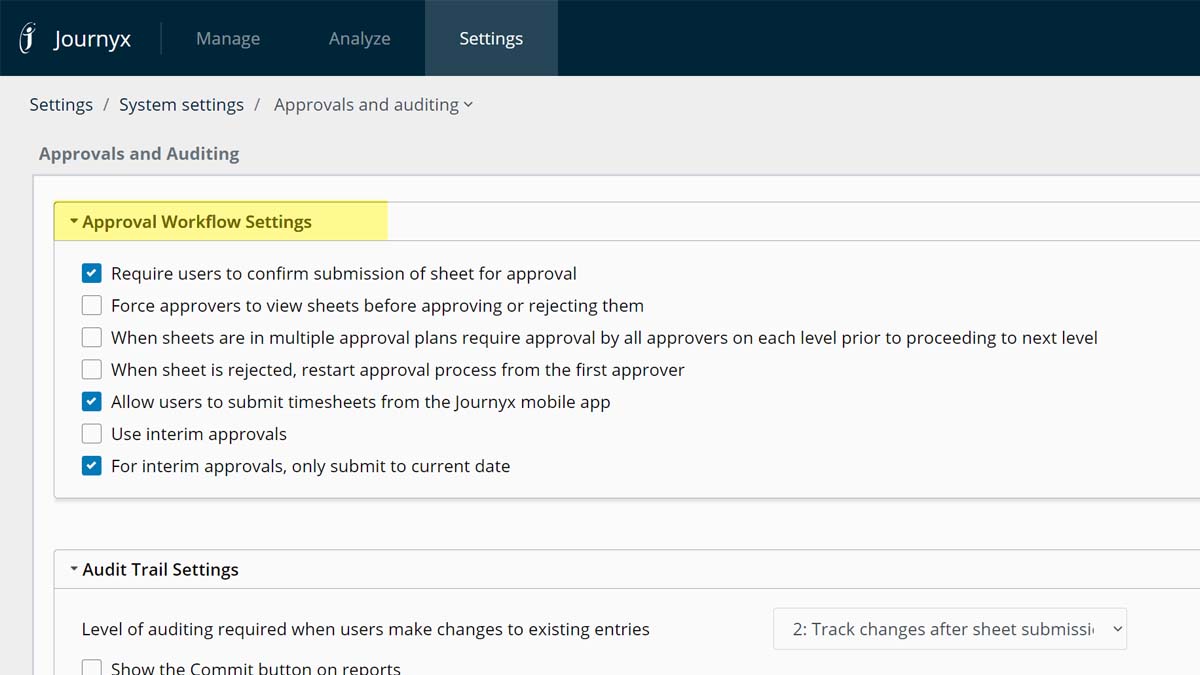
If you want to use automated emails, for example 'You are late with submitting your sheet', then you need to set-up when Journyx is going to check the status of sheets and send out the desired emails. After the approval system setting you set up your approval plan(s) and assign one or more users to each approval plan.

Approval Plans

Starting to use approval plans is easy

Overview Approval Plan actions

Here is an overview of the settings of an approval plan.

Approval Plans

Approval plan set-up possibilities